
-GETTING_HANDS_ON-
Watch.This.Space.
I have a great passion for Architecture design, but it’s not my be all and end all. What initially drew me to this field was my love of working with my hands, so this is where this page comes in.
Below you'll find a number of projects which dramatically vary in terms of scale and complexity. Some were undertaken alongside my educational studies as a means to clear my head at times, while others represent a research module undertaken across both years of my Masters in Architecture course at Newcastle University. All of them constantly make me think about not wanting to be in a office for the rest of my life and get back to working with my hands, in whatever form I can muster.
So scroll down, have a poke about and see what's what........
Not.Afraid.To.Get.Down.And.Dirty
Back on-site we go
Due to unfortunate events I was made redundant from my Part II Architectural position at Moon Architect+Builder, just prior to Christmas. As frustrating and disheartening as this was, there is always a silver lining.

The silver lining is (as you may have guessed) was that I moved to working on site. This is something that a lot of architects never have the opportunity or desire to experience, which I think is a really shame and should be encouraged far more than it currently is.
Anyway, so onto site I went, with a fresh hammer, some new work clothes and surprising to those in both the office and on site, a half decent idea of what I was doing. Remember, I spent most of my two years at Newcastle working through a Live Build project and my first job was working in a VW restoration garage. So i’ve always been around tools and I have a great interest in working with my hands and the joys of problem solving on-site. Initially I ended up working on a project that I was overseeing when I was in the office, this proved to be a hilarious position for both myself and the other site guys. I didn’t always know exactly how we were supposed to achieve what was drawn on the issued drawings. I did however know damn well why they’d been drawn that way, because I’d been the one who’d drawn them.
Next, I headed to a new project in which I head the great pleasure of doing a ‘sea-saw prop” to form a new opening in a rather grand Clifton based house. The process on how we approached this opening and the stages we went through was fascinating, plus it was like playing with giant Meccano. Below is a stage by stage(ish) documentation of the process of knocking through a wall when there’s a flat below you, limiting how you prop the existing wall goes.


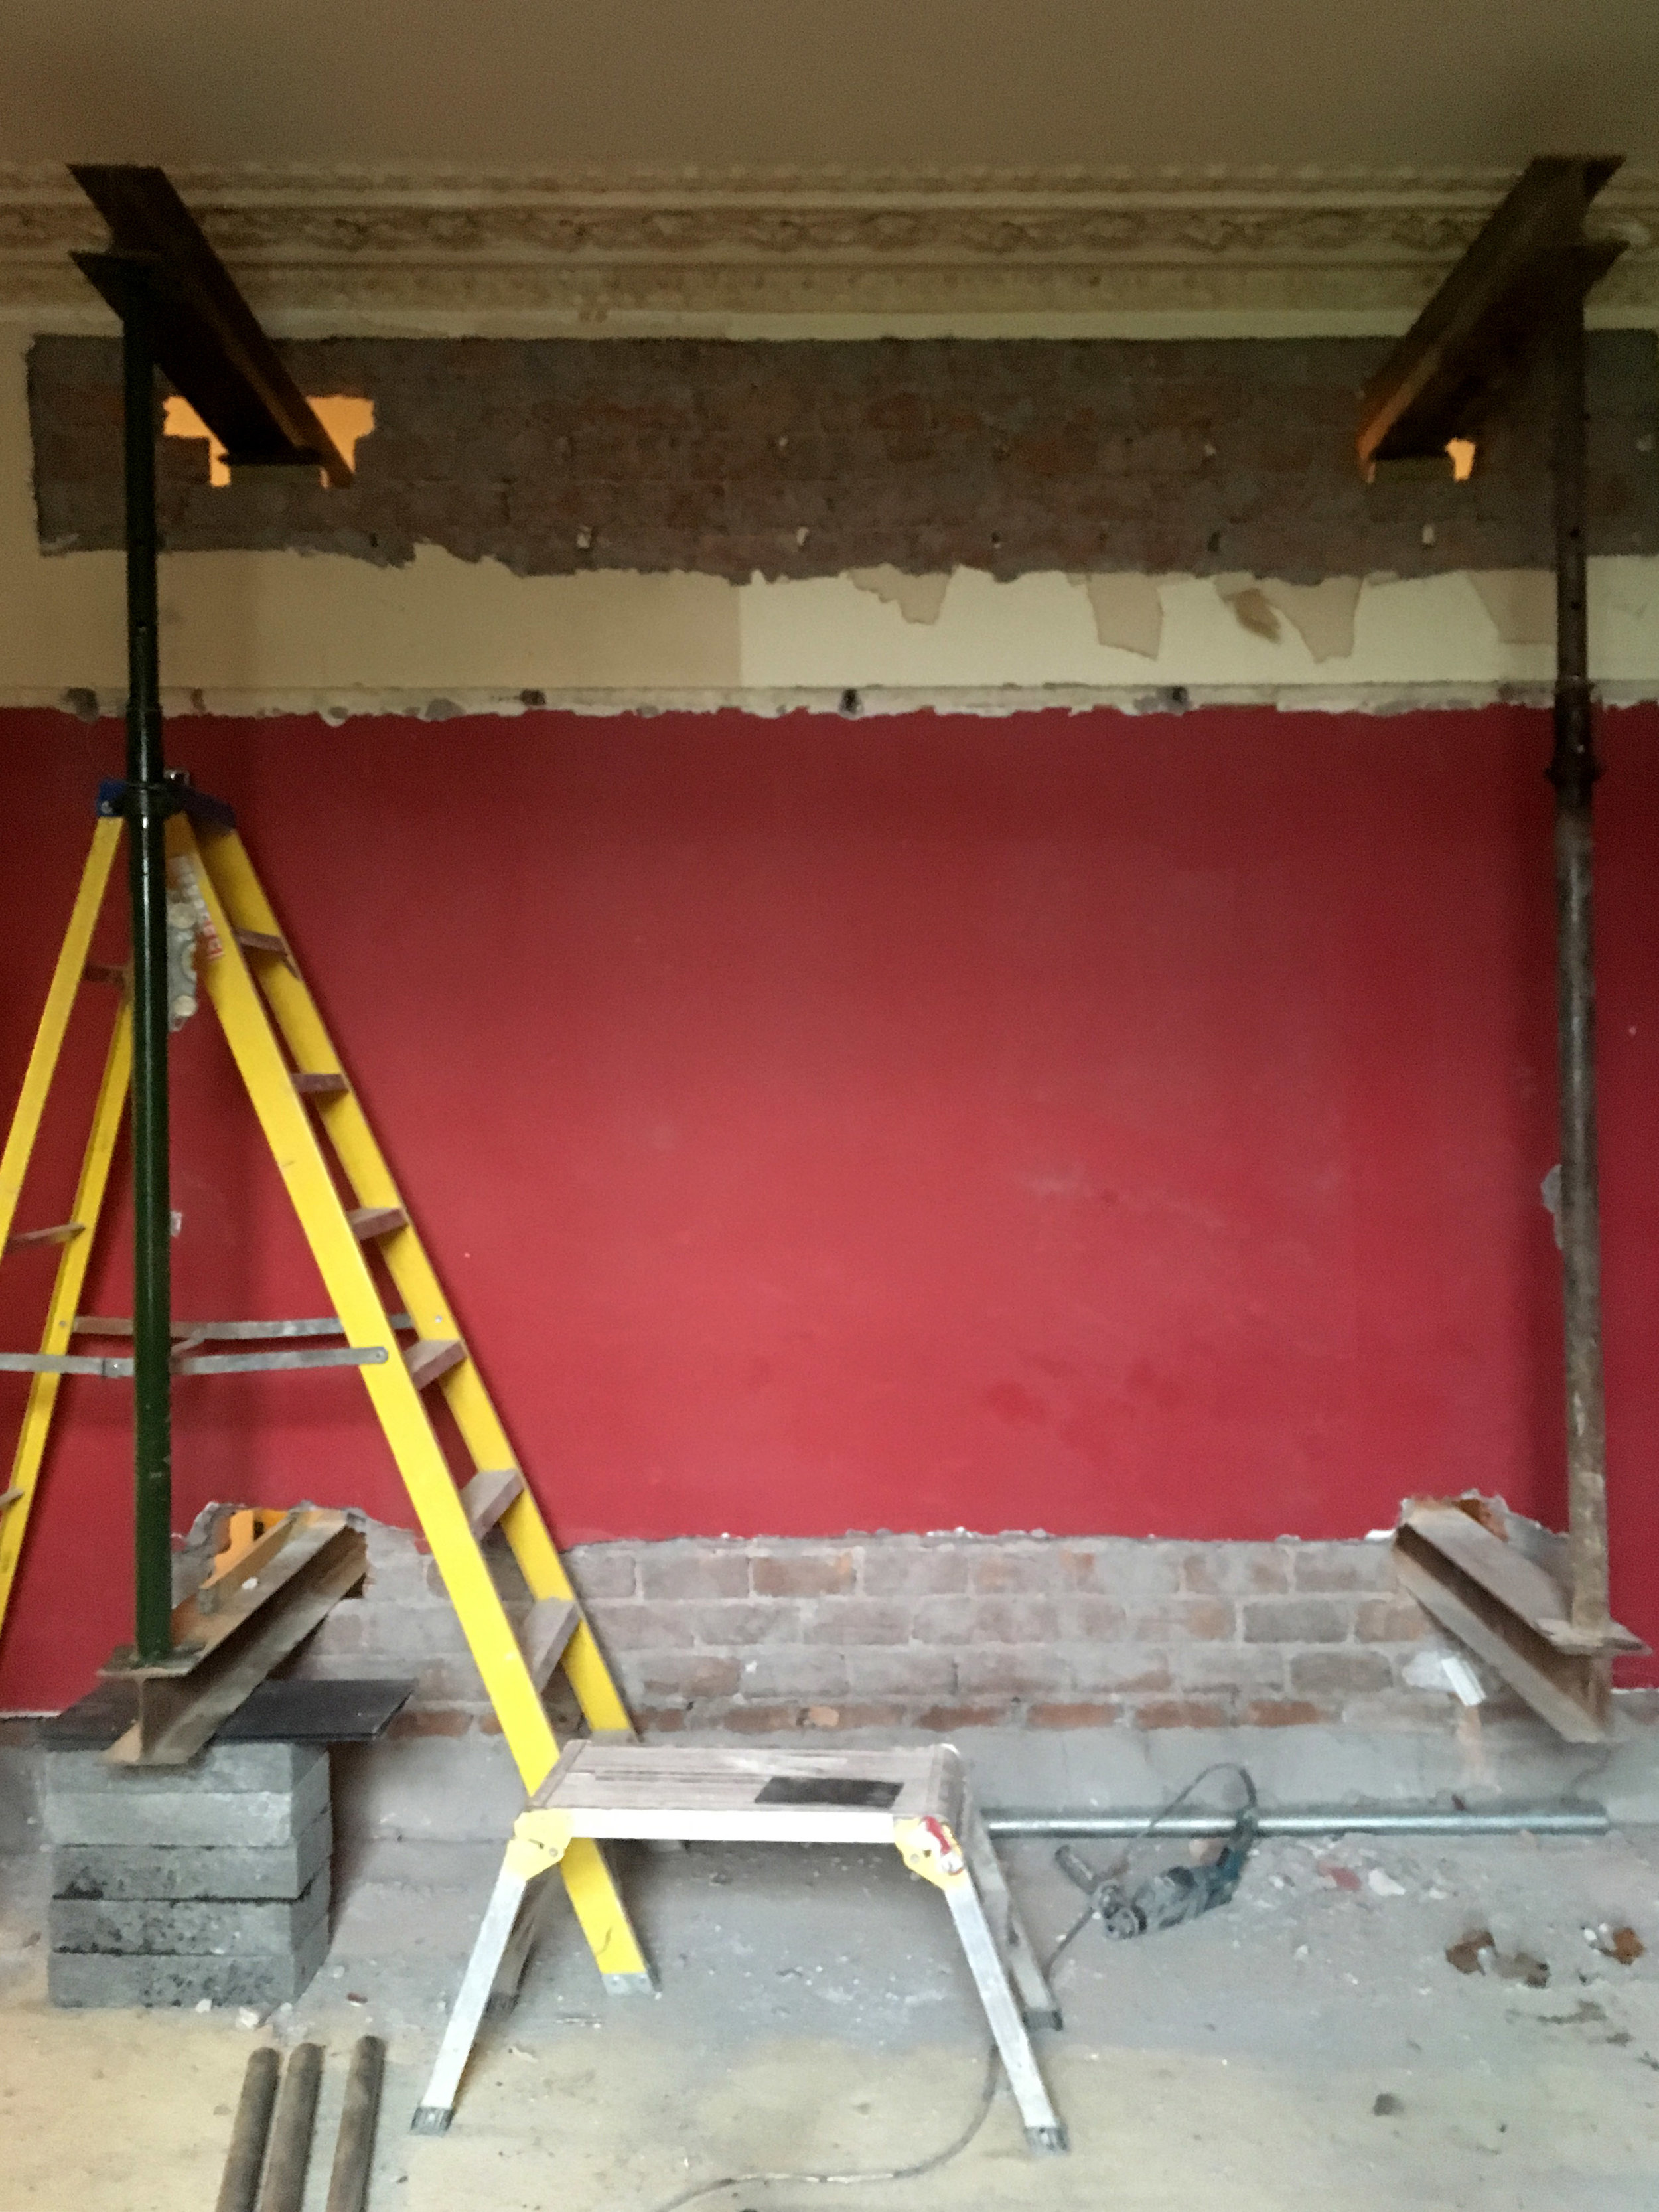
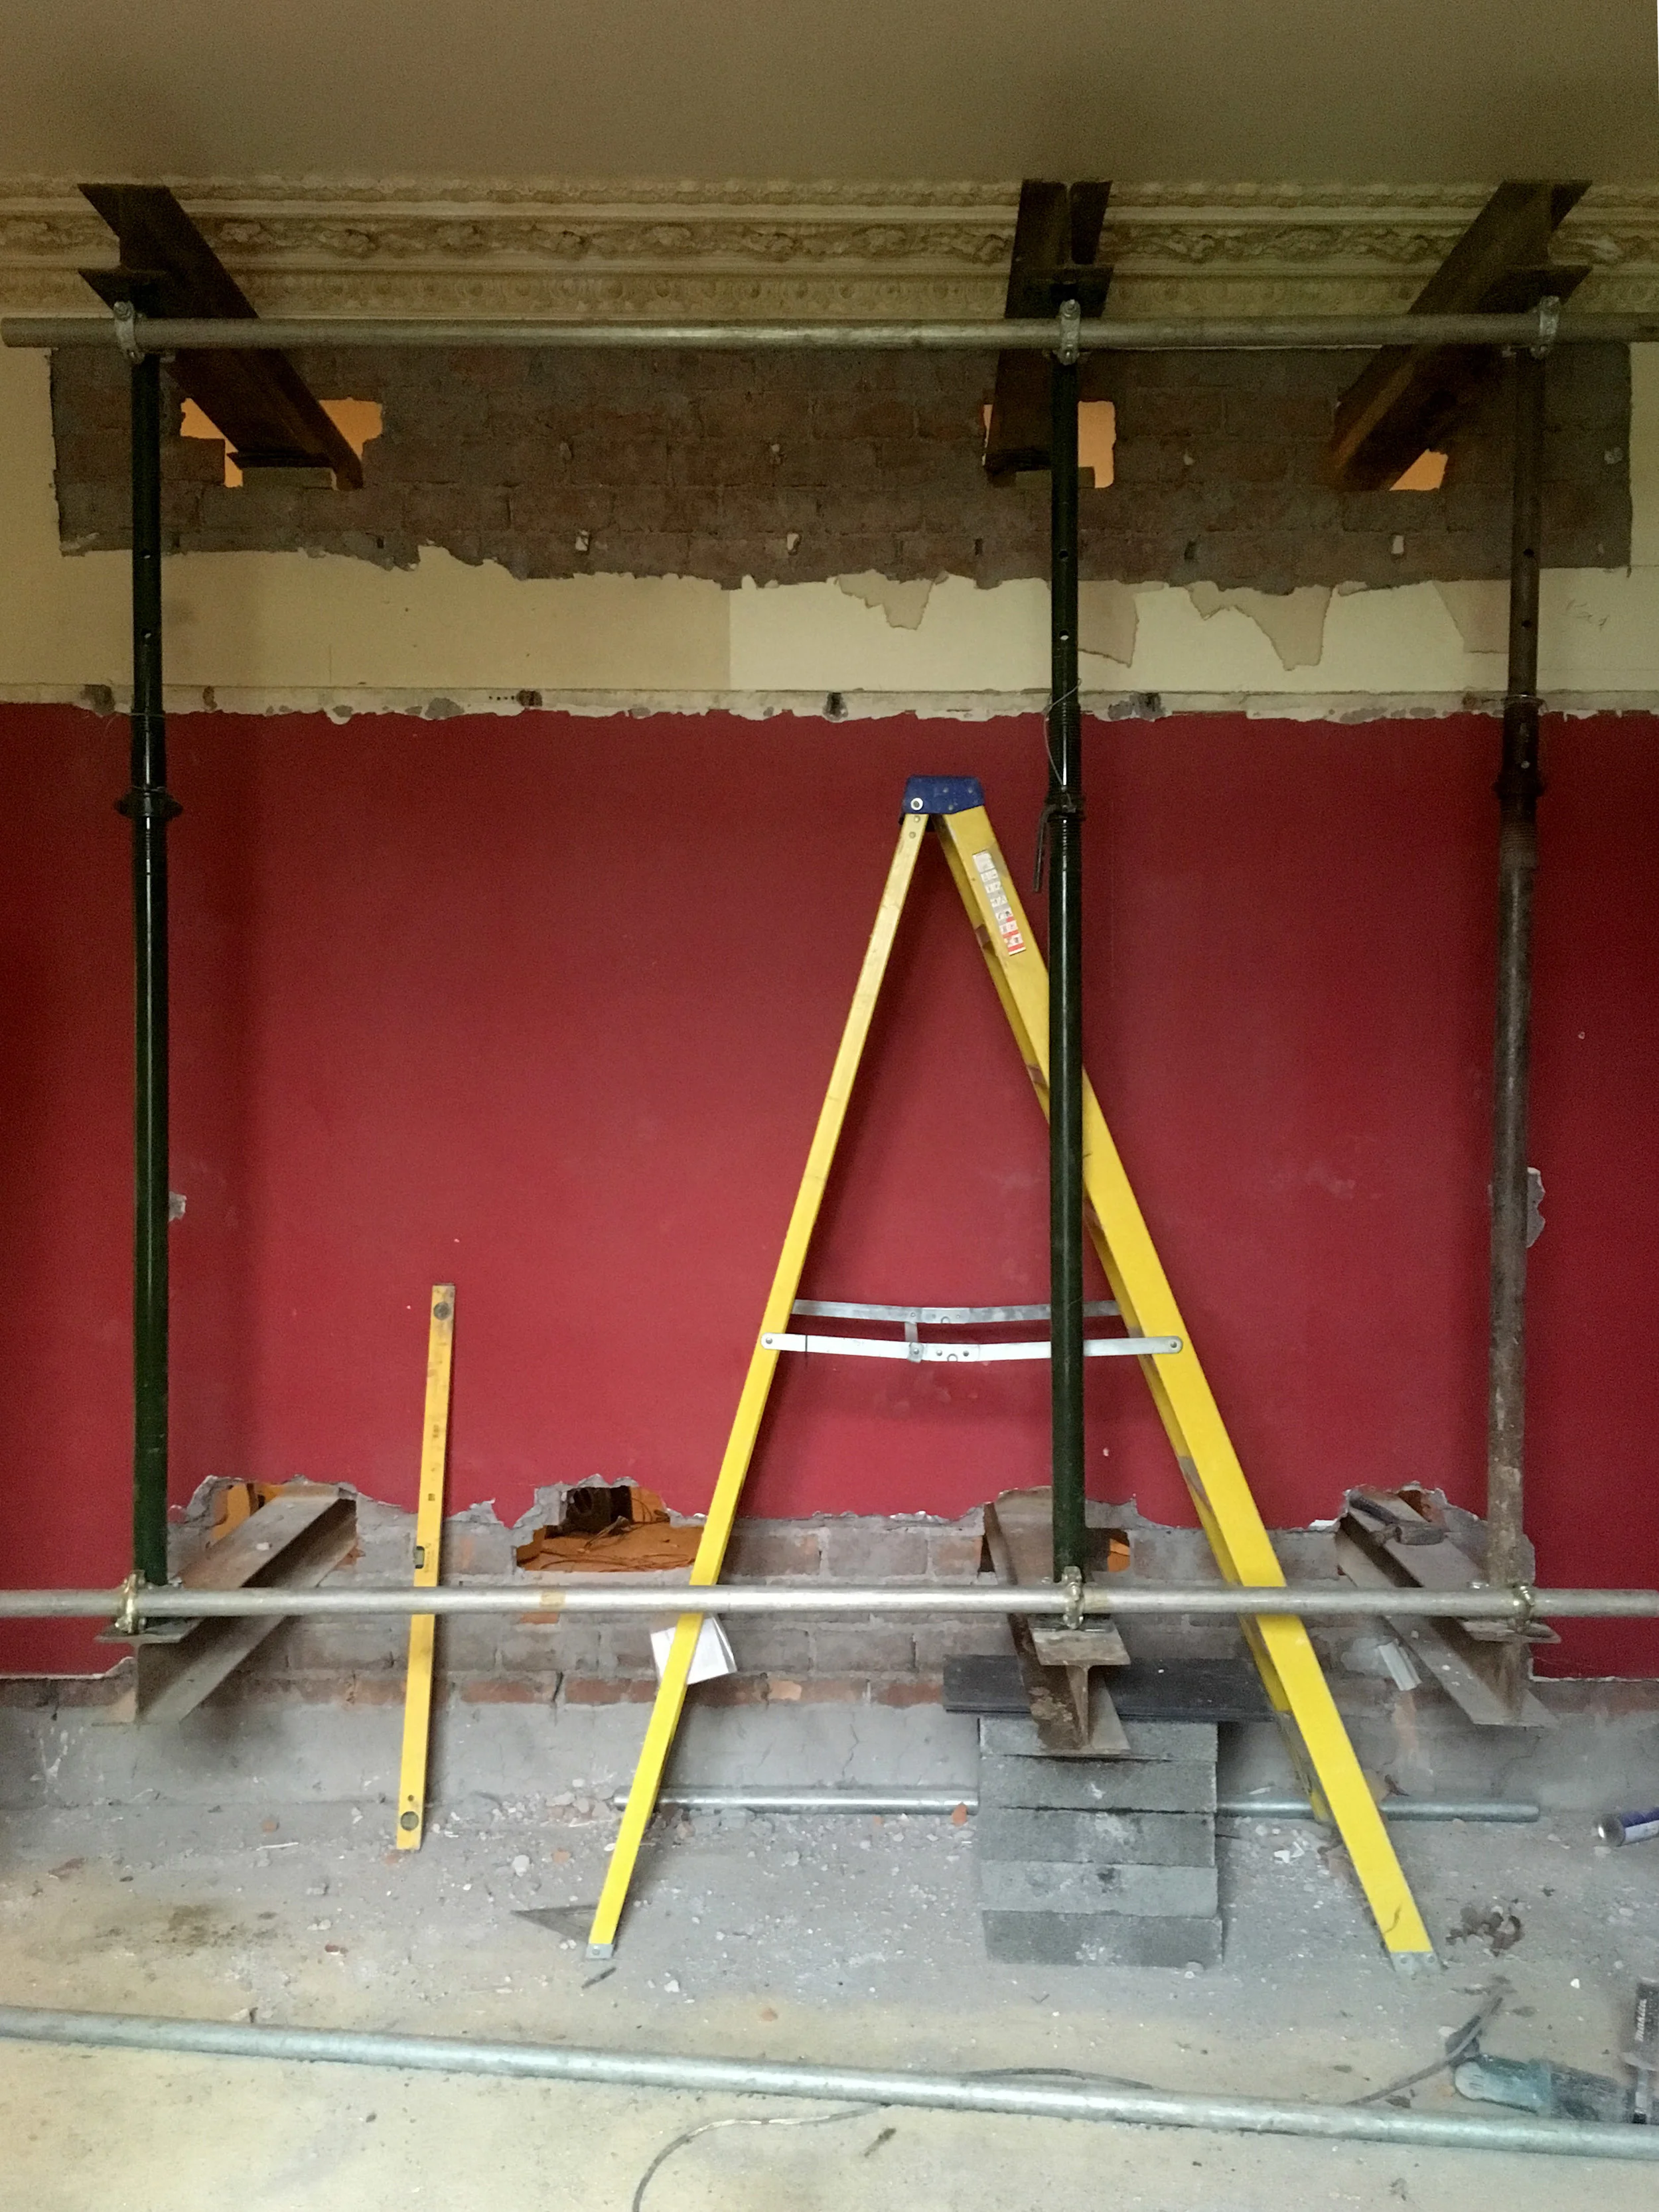

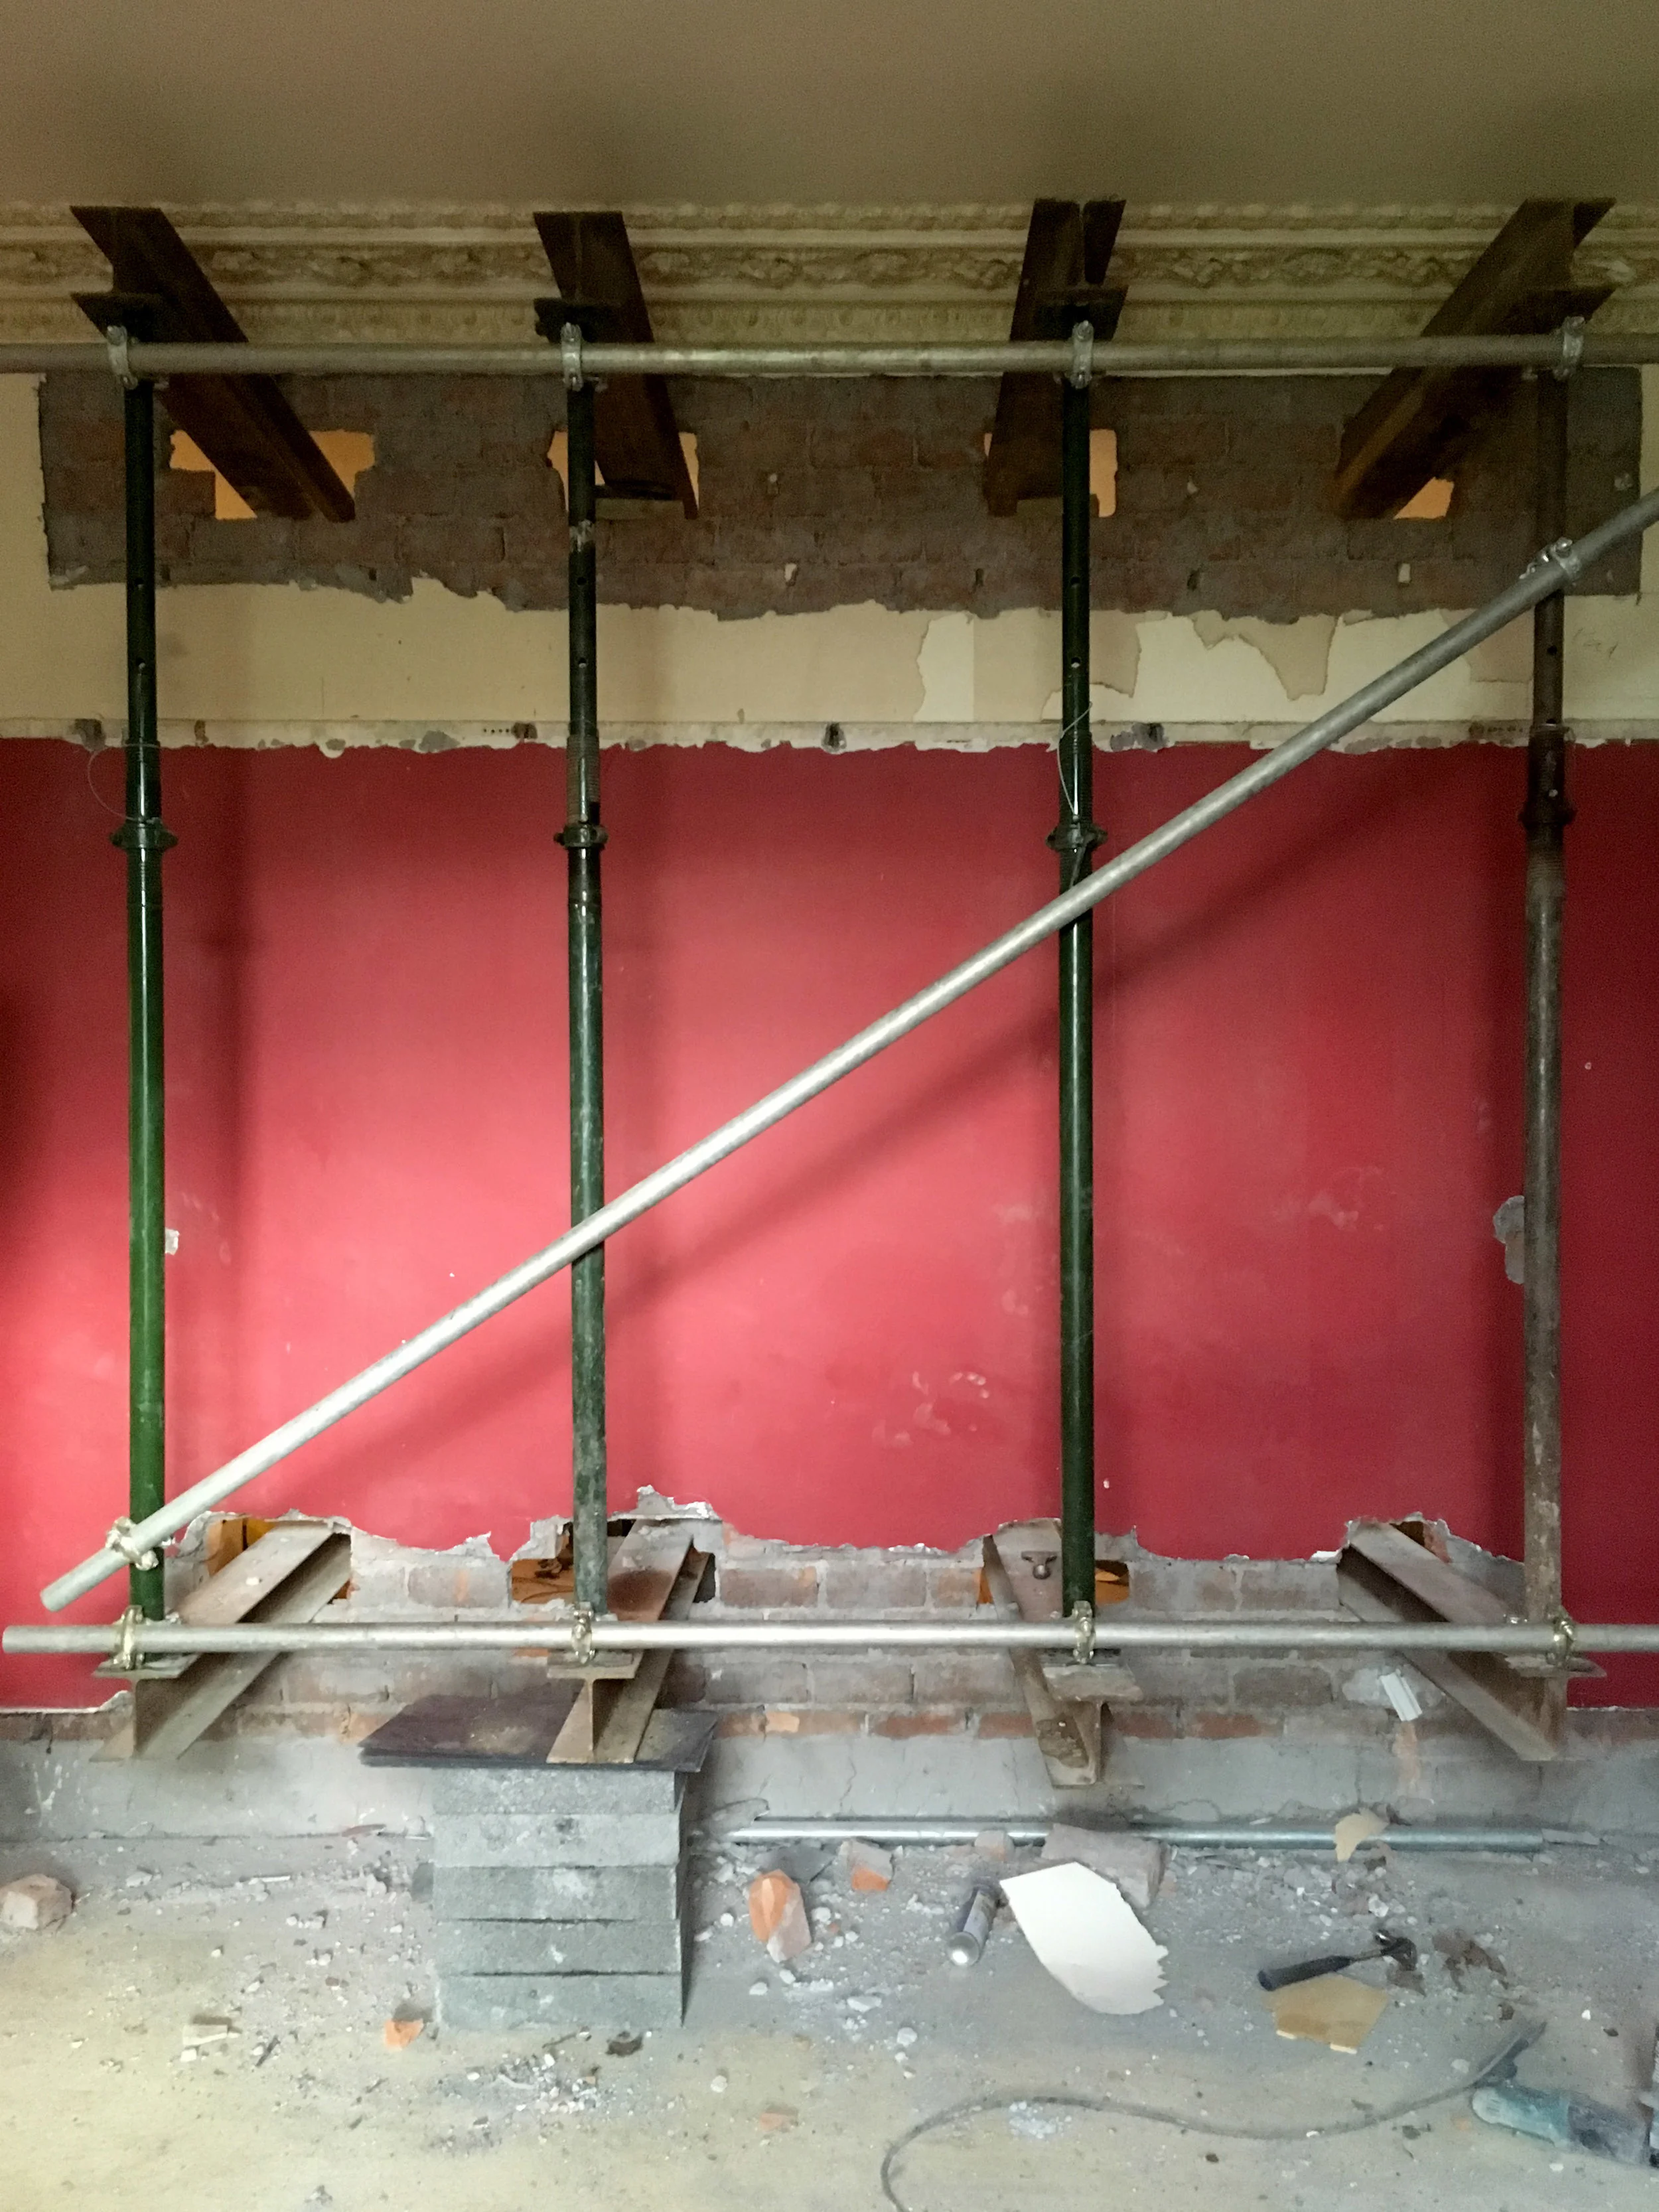


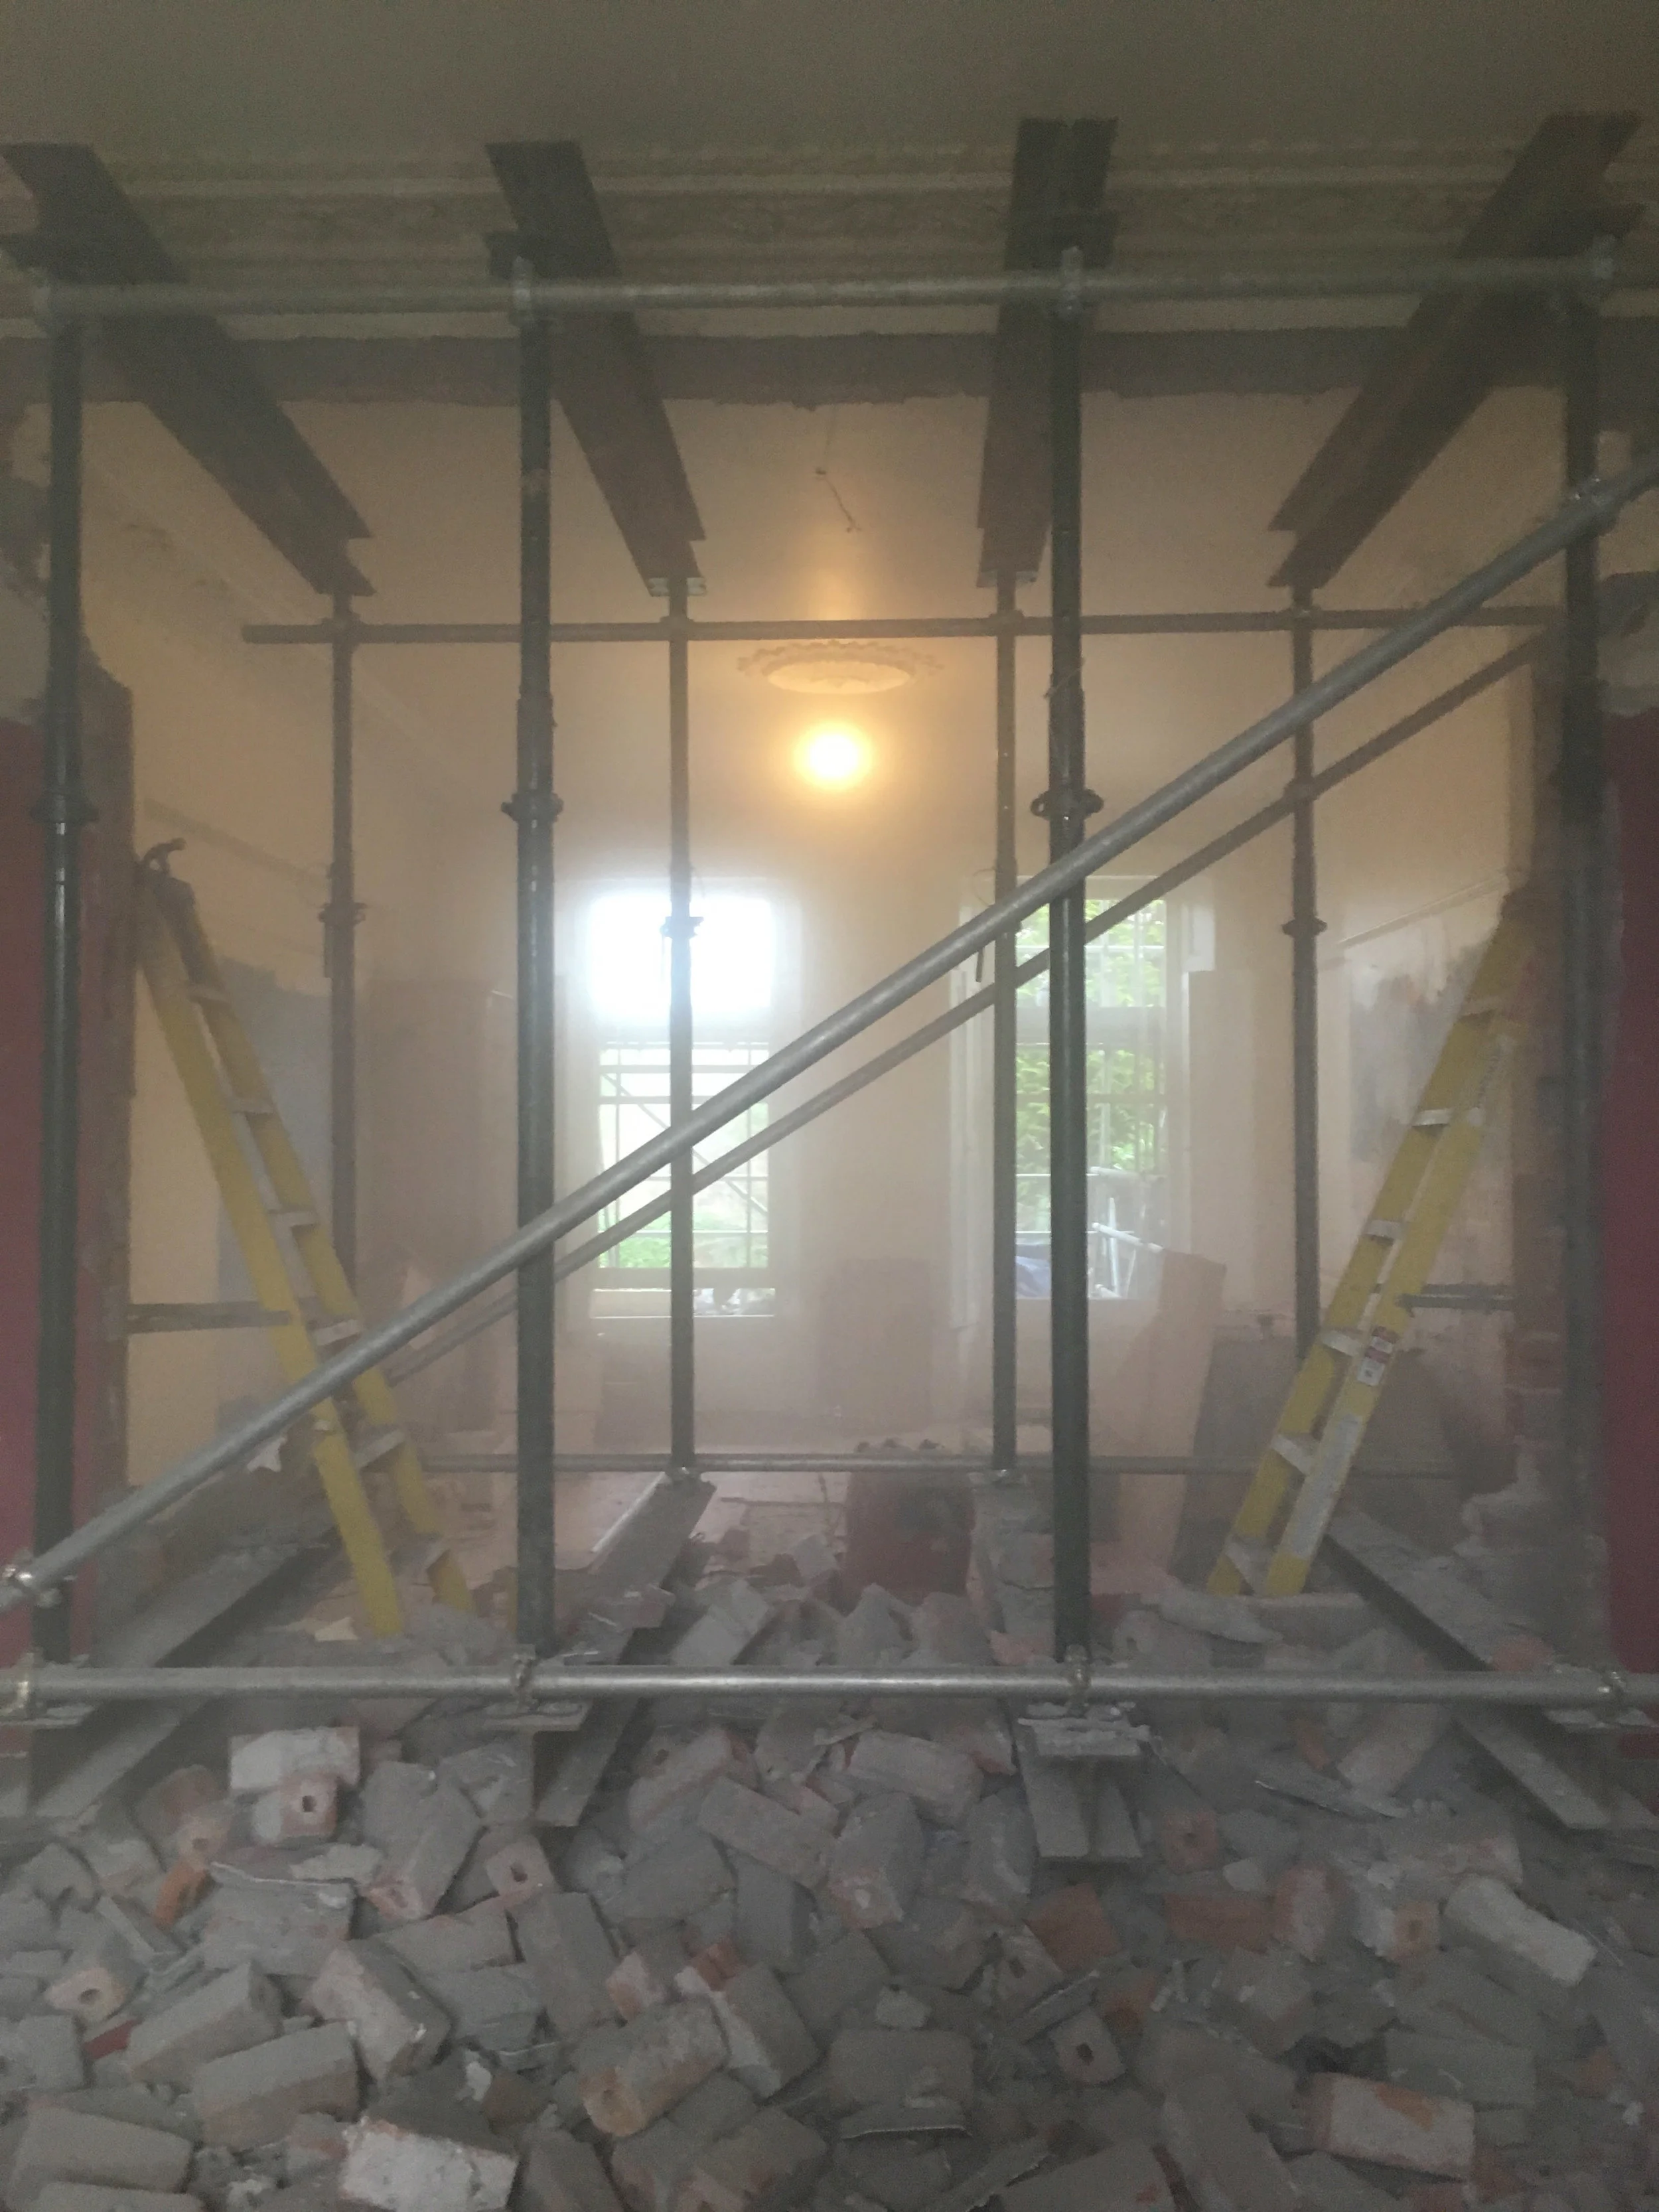

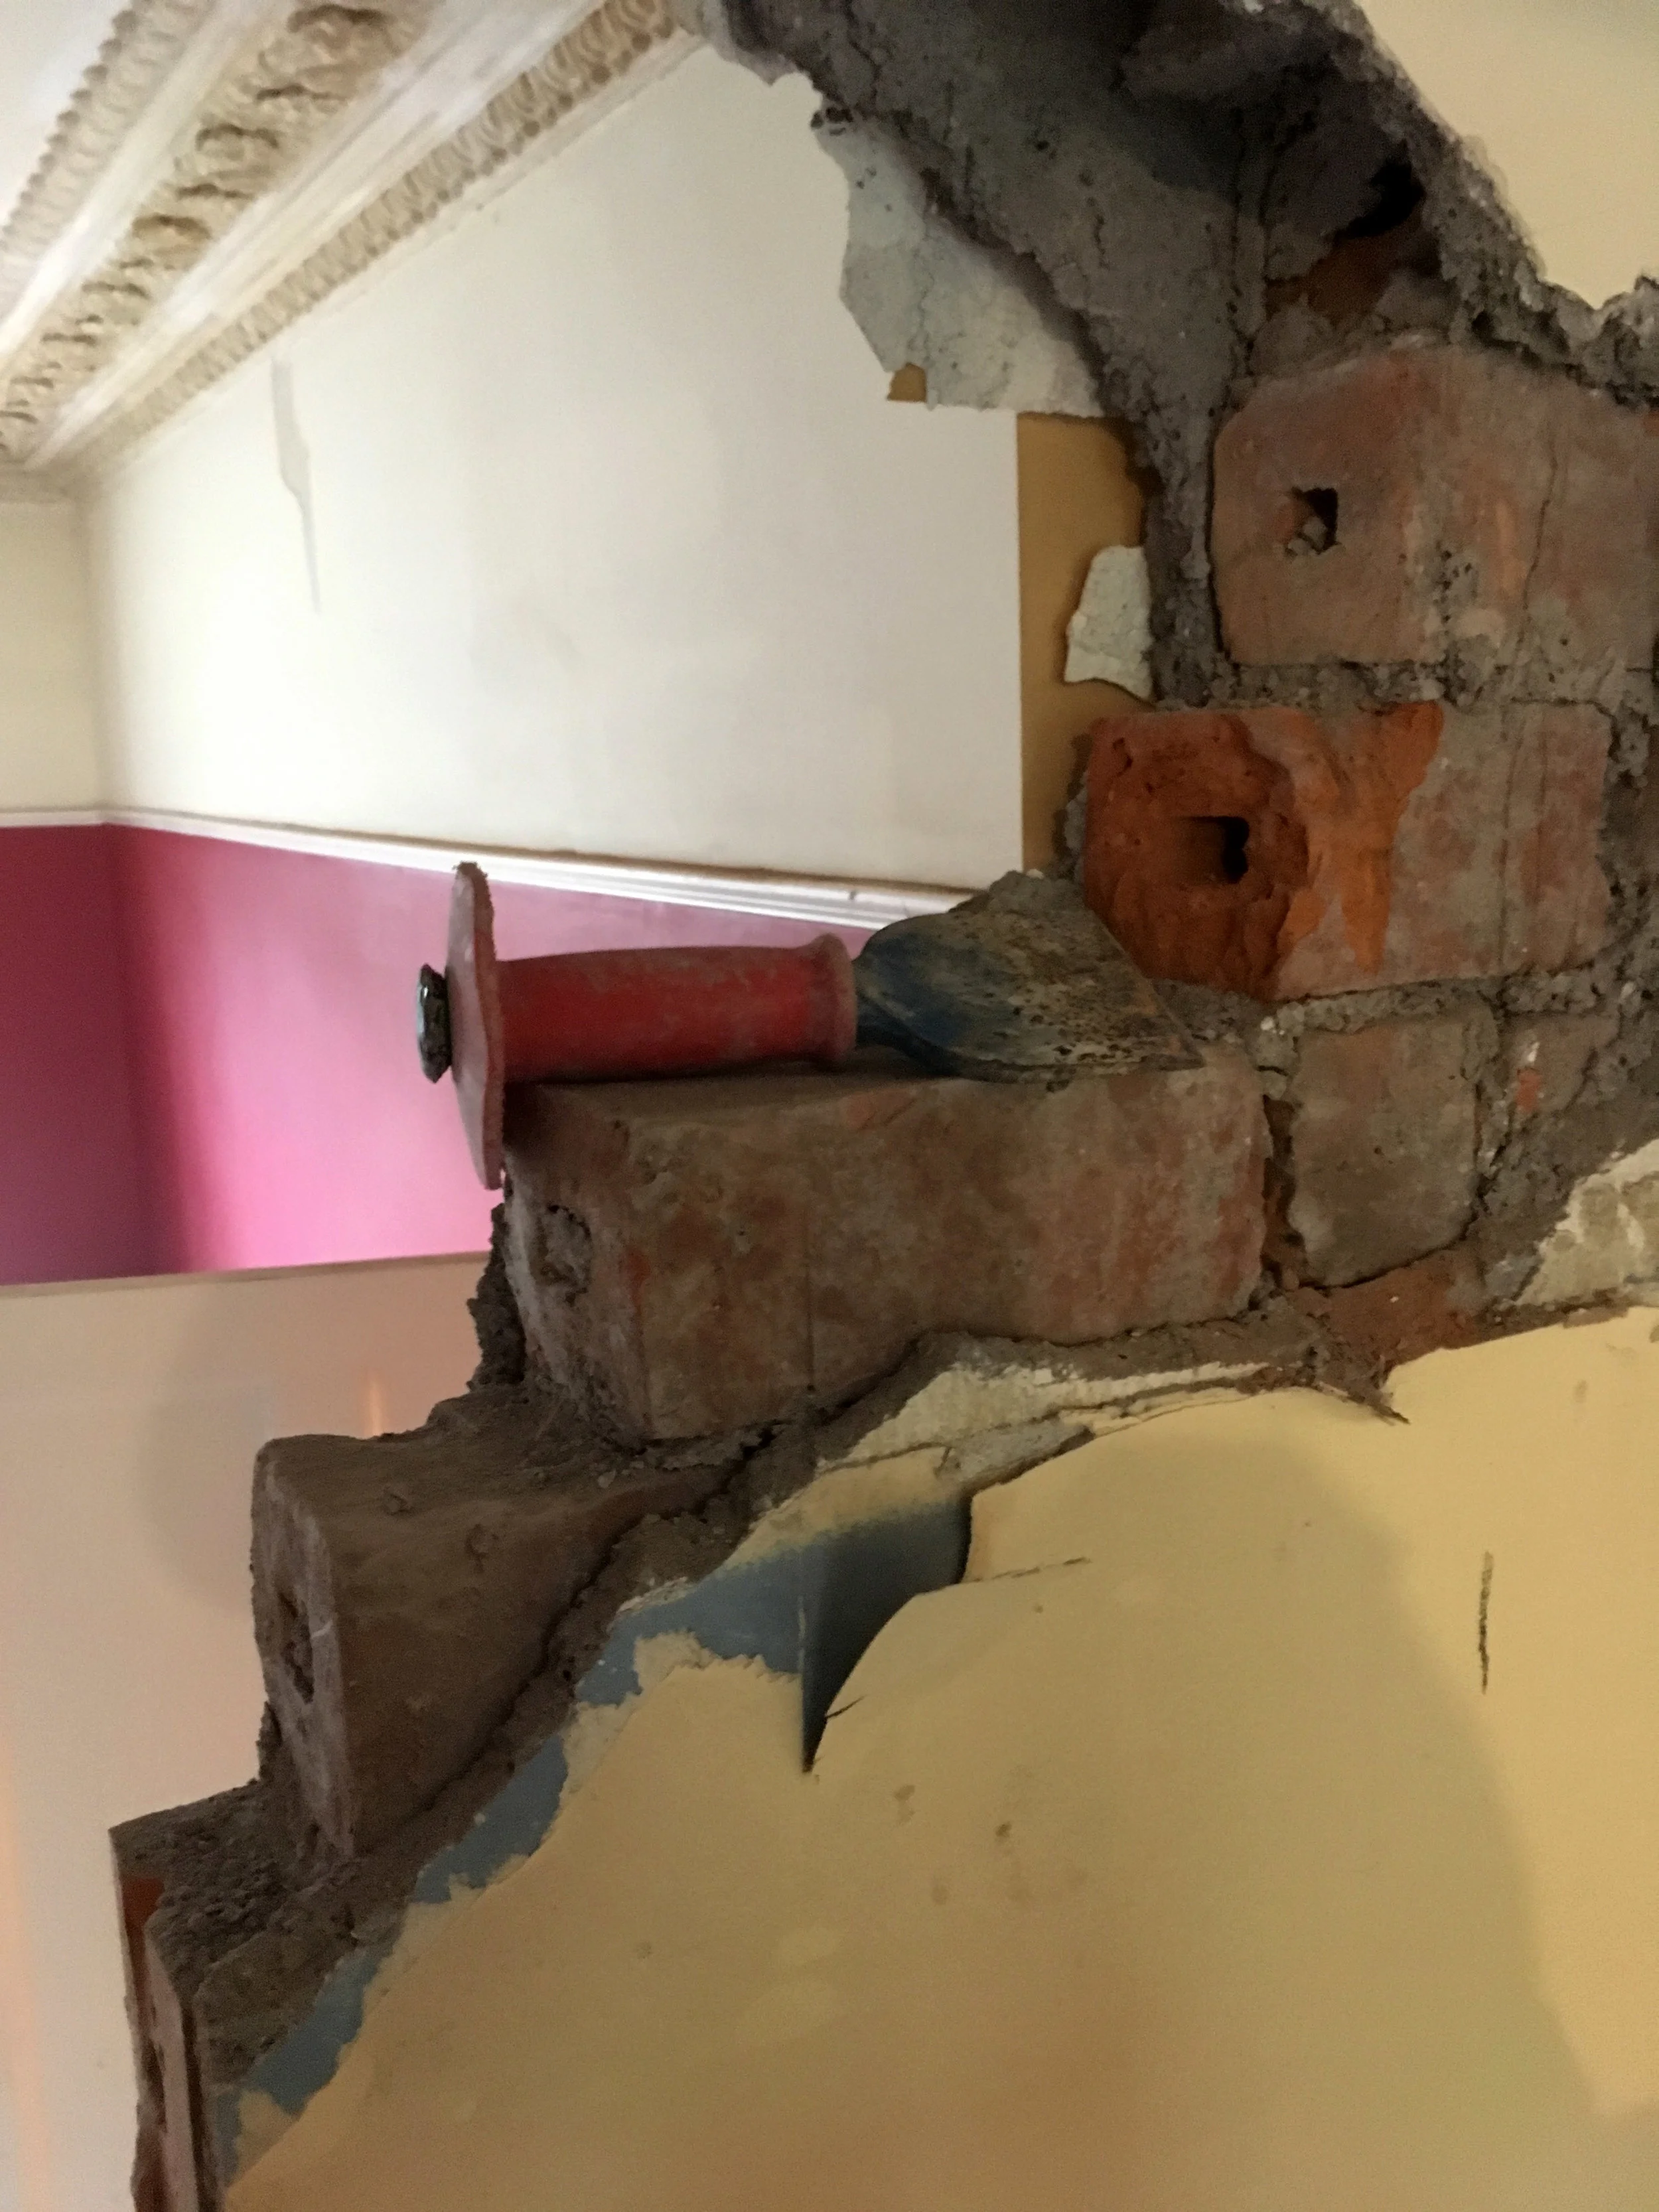


One of the great joys of doing demo work is all the things you find hidden away under floor boards and in the backs of re-re-re-re-painted cupboards. Below is snapshot of a few of these treasures, plus some of the weird textures you can find (was being an arty snob for abit on site I have to admit).


All in all, it was great to get back onto site, I really do believe that anyone working to become an architect, or any designer should spend some time on-site or in a workshop. It opens your eyes to exactly how heavy a brick is, which makes you far more aware of the pure physical excursion and time required to remove a wall or shift a pallet load of the buggers up to the third storey. Or helps you to understanding that sometimes catching all your builders on-site half asleep is just part of the game, as you get what you pay for. Low wages mean low energy, it’s as simple as that. Don’t cheap on the end that’s actually making the product, or you’ll end up with a dog.
TTFN
Project.FOUR : THE.BIG.LIVE.BUILD
As part of my Masters of Architecture study I undertook a Live Build project for my Linked Research module. This was by far my greatest undertaking to date, accompanied by 8 other Newcastle students we undertook the designing, sourcing, fabricating and eventual construction of three installations for Keilder Art & Architecture all located within the Keilder / Bakethin Weir area.
Bakethin Masterplan Presentation & Design Work

The structures were to form part of a wider Bakethin Masterplan, from Kielder Water & Forest Park Development Trust and Kielder Art and Architecture. We were asked by the client to provide a coherent design package, which together would form a journey for visitors starting at the castle carpark and then heading towards Kielder Lake. Thus, providing not just a bird watching experience but instead aim to meet the needs of many and reinforce the Keilder brand.
Welcome Point Initial Presentation Board
The aim for this design was to create a bold striking form which would fight against the linear nature of the tall pine trees. The wrapped form developed around the idea of covering the functions of the welcoming point and interacting with the surrounding trees. This has created a covered but not enclosed space while also highlighting an intriguing view up through the shelter into the forest canopy above.

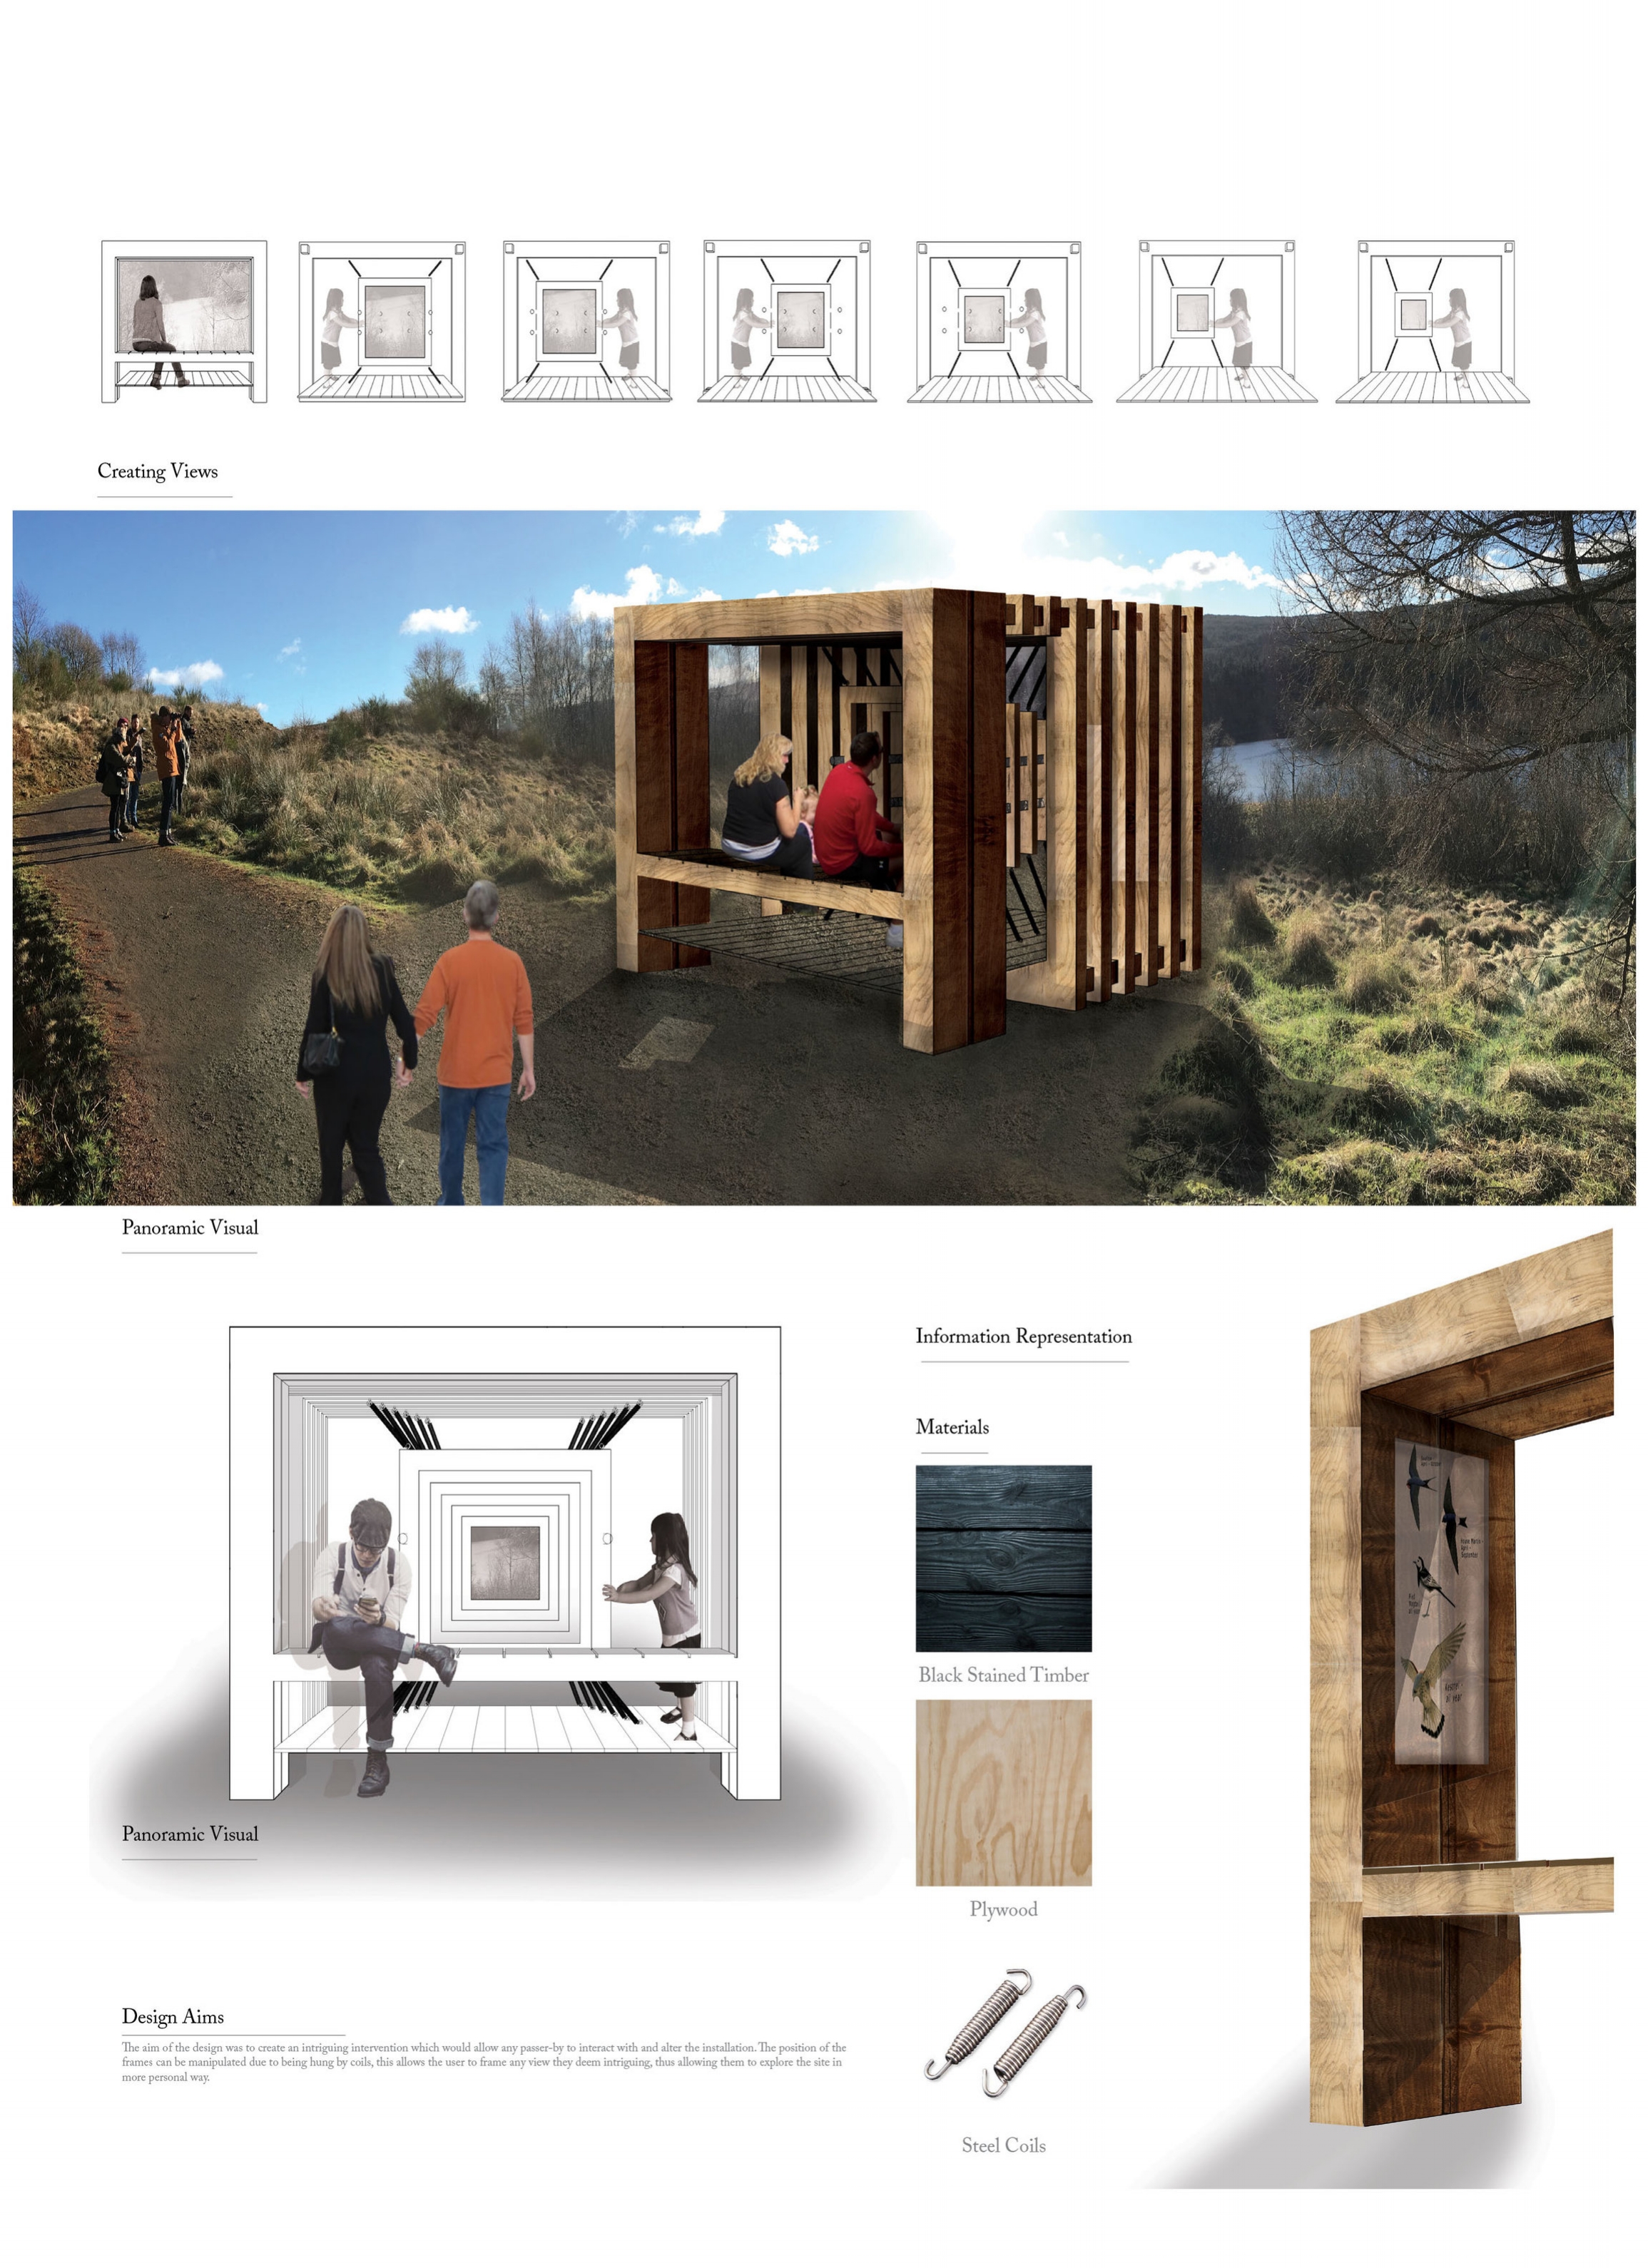
Bird-Hide Initial Design Presentation Board
The main aim of the bird hide is to encompass the existing need for a hide within the position. We however also looked to create a special experience which any passer by could enjoy. The form and orientation of the hide has been based around framing four significant views across the site, while also taking into account the specific design needs of a bird hide. As with the Welcome Point and View Point we aimed to frame the views while also wrapping the function of the design in an expressed roof element.

View Point Initial Design Presentation Board
The aim of the design was to create an intriguing intervention which would allow any passer-by to interact with and alter the installation. The position of the frames can be manipulated due to being hung by coils, this allows the user to frame any view they deem intriguing thus allowing them to explore the site in a more personal way.
Designing By Making & Learning
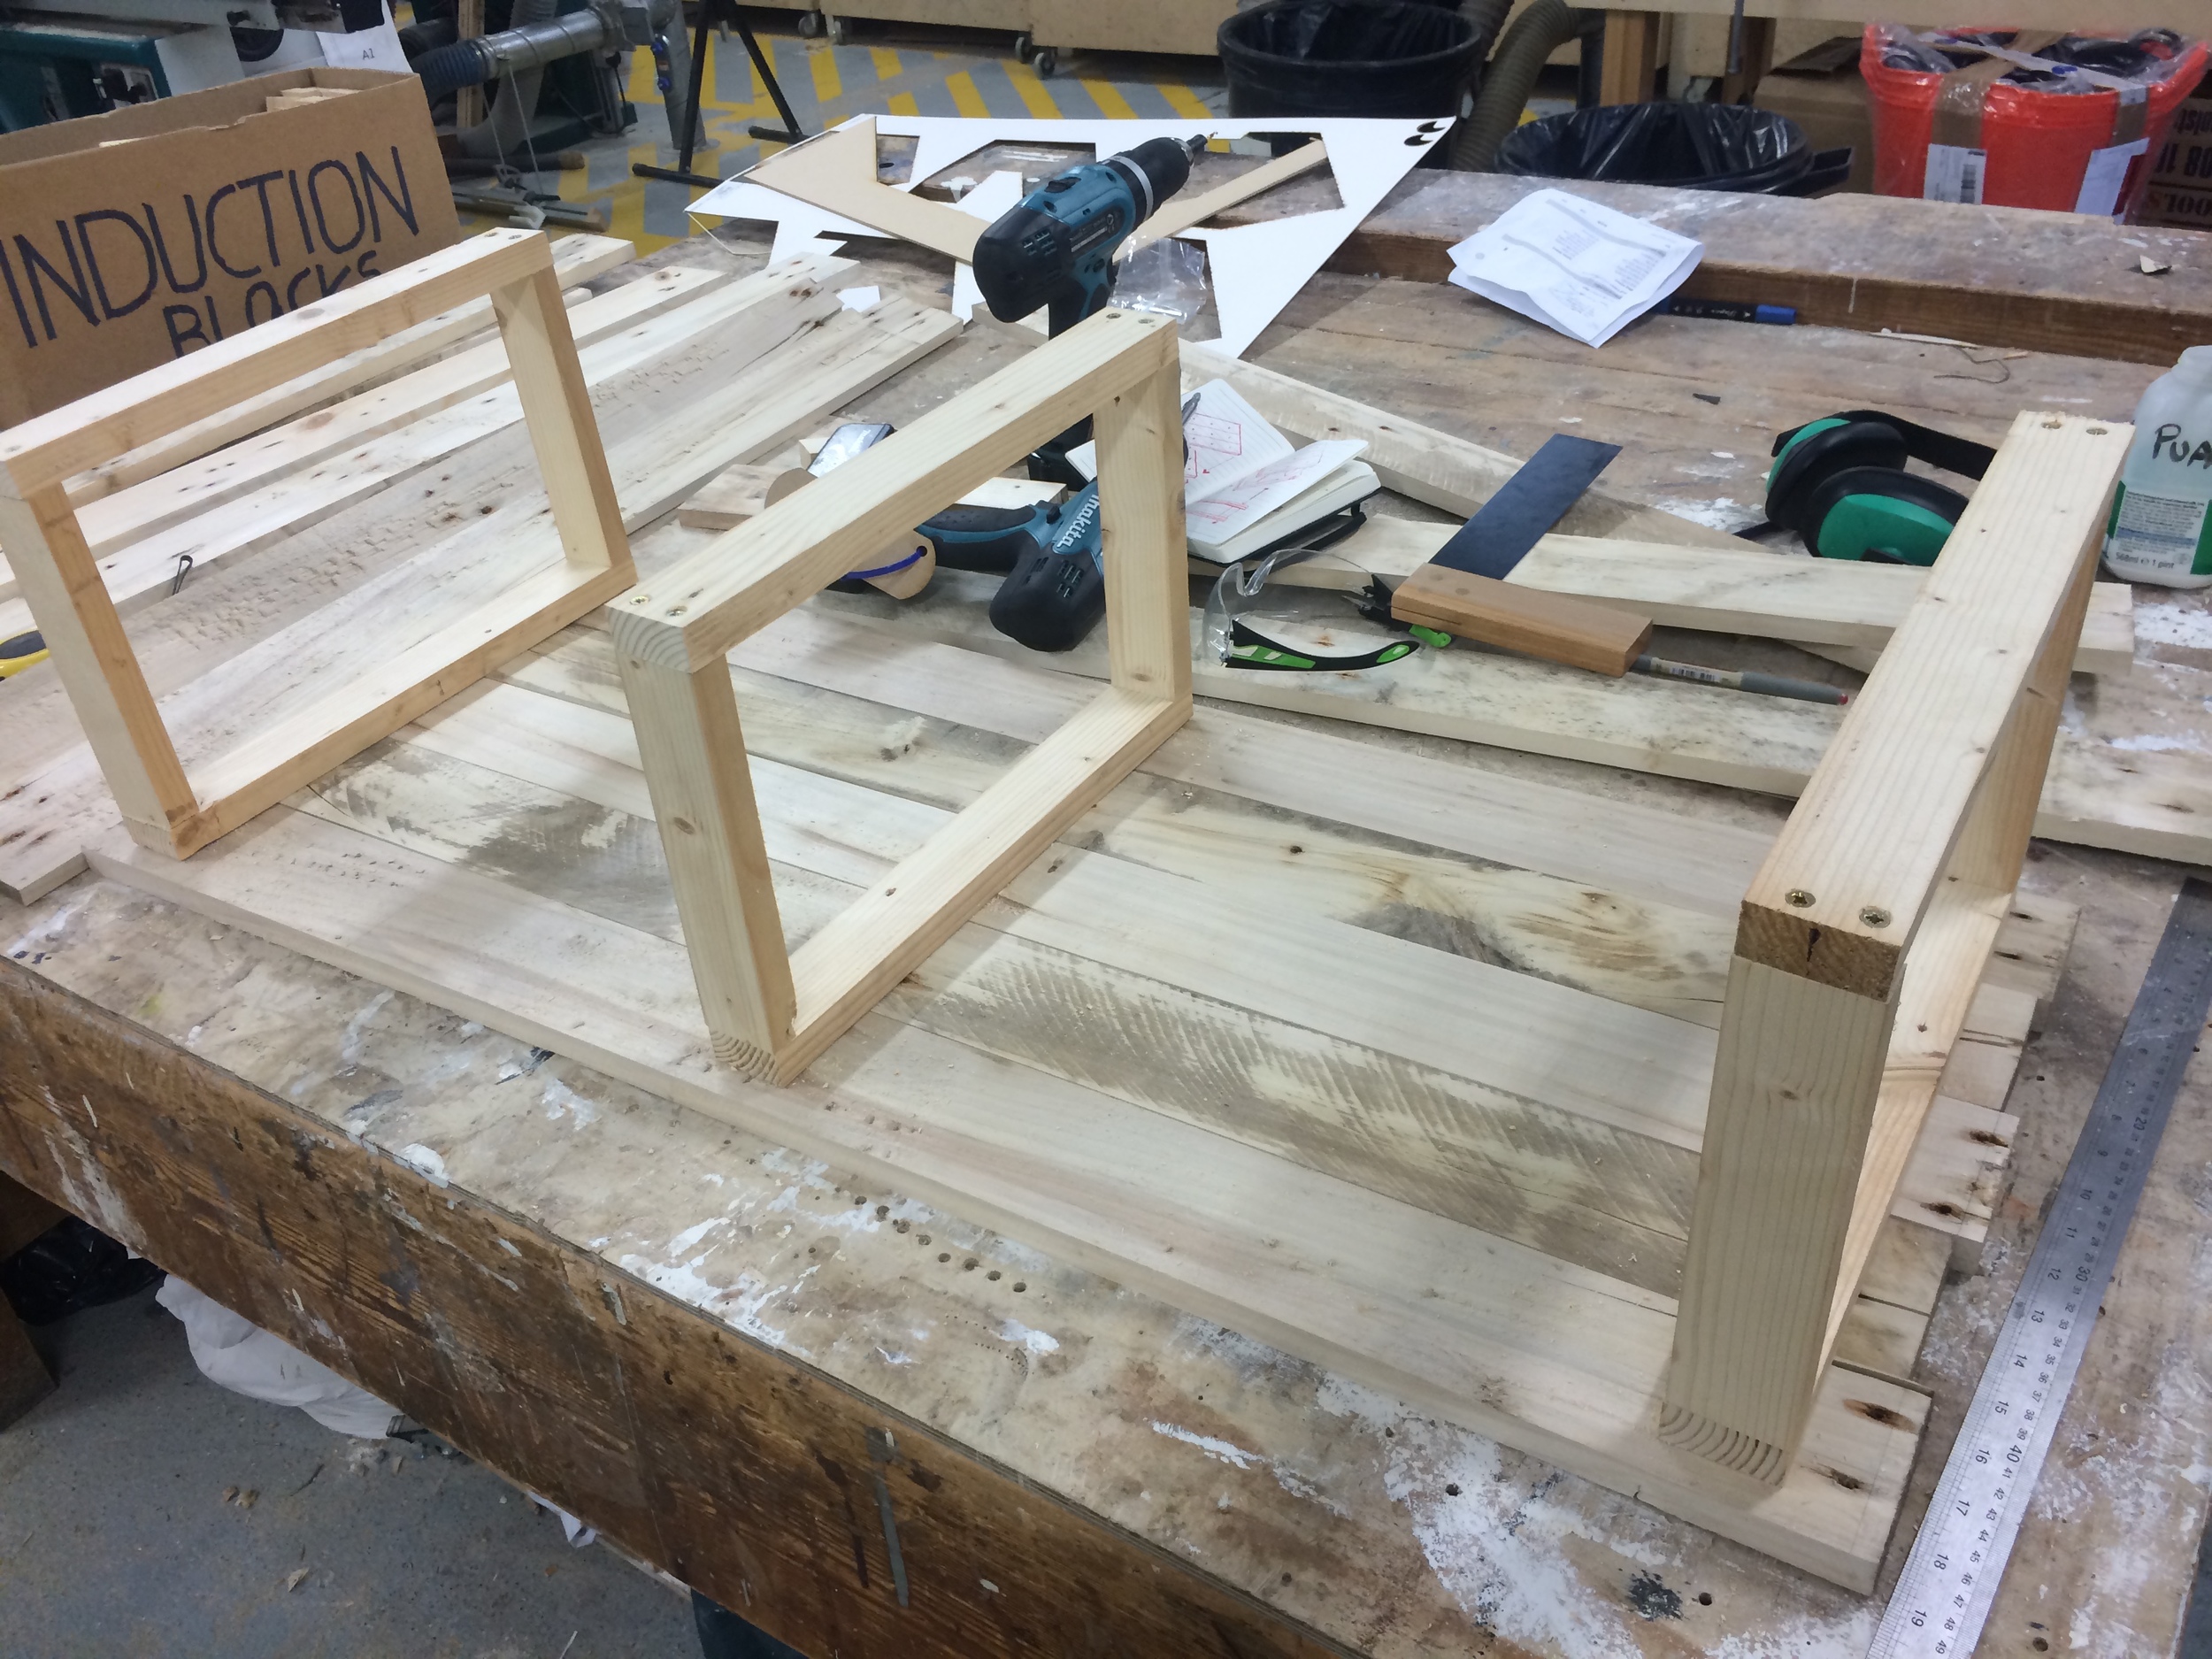
One of the main purposes of this module was to learn new skills, work with different people and undertake research. In order to successfully complete the various structures quickly and effectively on our exposed site, we undertook a number of prefabrication and prototyping days. These were invaluable undertakings as they both helped us hone our skills required for future on site work, allowed us to speed up production in some places while also enabling us to work with new materials.
Collaborating With Newcastle University Fine Arts Metal Workshop
Working with the metal workshop based within the Newcastle University Fine Arts department we produced a variety of angled wall brackets to support the tessellating form of the proposed bird hide. I personally took on this element of the prefabrication as the majority of the metal pieces were required for the Bird Hide's roof, which was my focus for the Technical Design Stage and for the Welcome Point. I along with two others were responsible for the redesign and complete technical package of the pavilion, which required a number of elements being bespoke fabricated externally.

Prototype Collaboration With Ex-Newcastle Student Hugh Miller
A day was spent at Hugh Millers furniture workshop in Liverpool, the aim was to prototype elements of the Welcome Point with specific focus on solving the issue of the bench design. We sourced material from a nearby timber supplier and worked through how we'd solve the connection of the horizontal timber members at the structural steel joints.

Off-Site Pre-Fabrication of Structural Components
In order to reduce the amount of time we'd be required work on-site in the often sub-zero temperatures, we undertook various stages of Pre-Fabrication. Elements for the welcome point were Pre-Fabricated at the University workshop due to the complex nature of the components, while larger simpler elements such as the Bakethin Hide's Sub Structure were completed at the Kielder Art & Architecture Kielder Workshop. These undertakings proved to be of great use, as they enabled high levels of accuracy across multiple elements, thus increasing the ability to align the elements correctly on-site.


Technical Roof Design - Wildlife Hide
My most challenging task of the entire live Build project was the detailing, or rather more engineering required to create the roof. The main issues we the creation of a 6.4m long beam out of maximum length 4.8m beams. Then the design of how the beam would connect to a column and the foundations for the column. Finally, the actual roof had a very tight design ambition of showing now screws while also being top hung and over sailing the wall line. This would involve a number of intense discussions with our assigned Engineer Artem before the final favourable resolution was reached.

Roof Construction Sequences
Due to having other work responsibilities during this year, I couldn’t always be on-site, so during the period that the roof was being erected I had to produce a series of construction sequence diagrams for people to continue the work on site without me. This was one of the challenging tasks of being the sole designer of the roof that all questions could only be directed at me. This resulted in me having to constantly micro-manage the construction team, while also working myself. It was nothing short of exhausting but very exhilarating when the roof all came together.

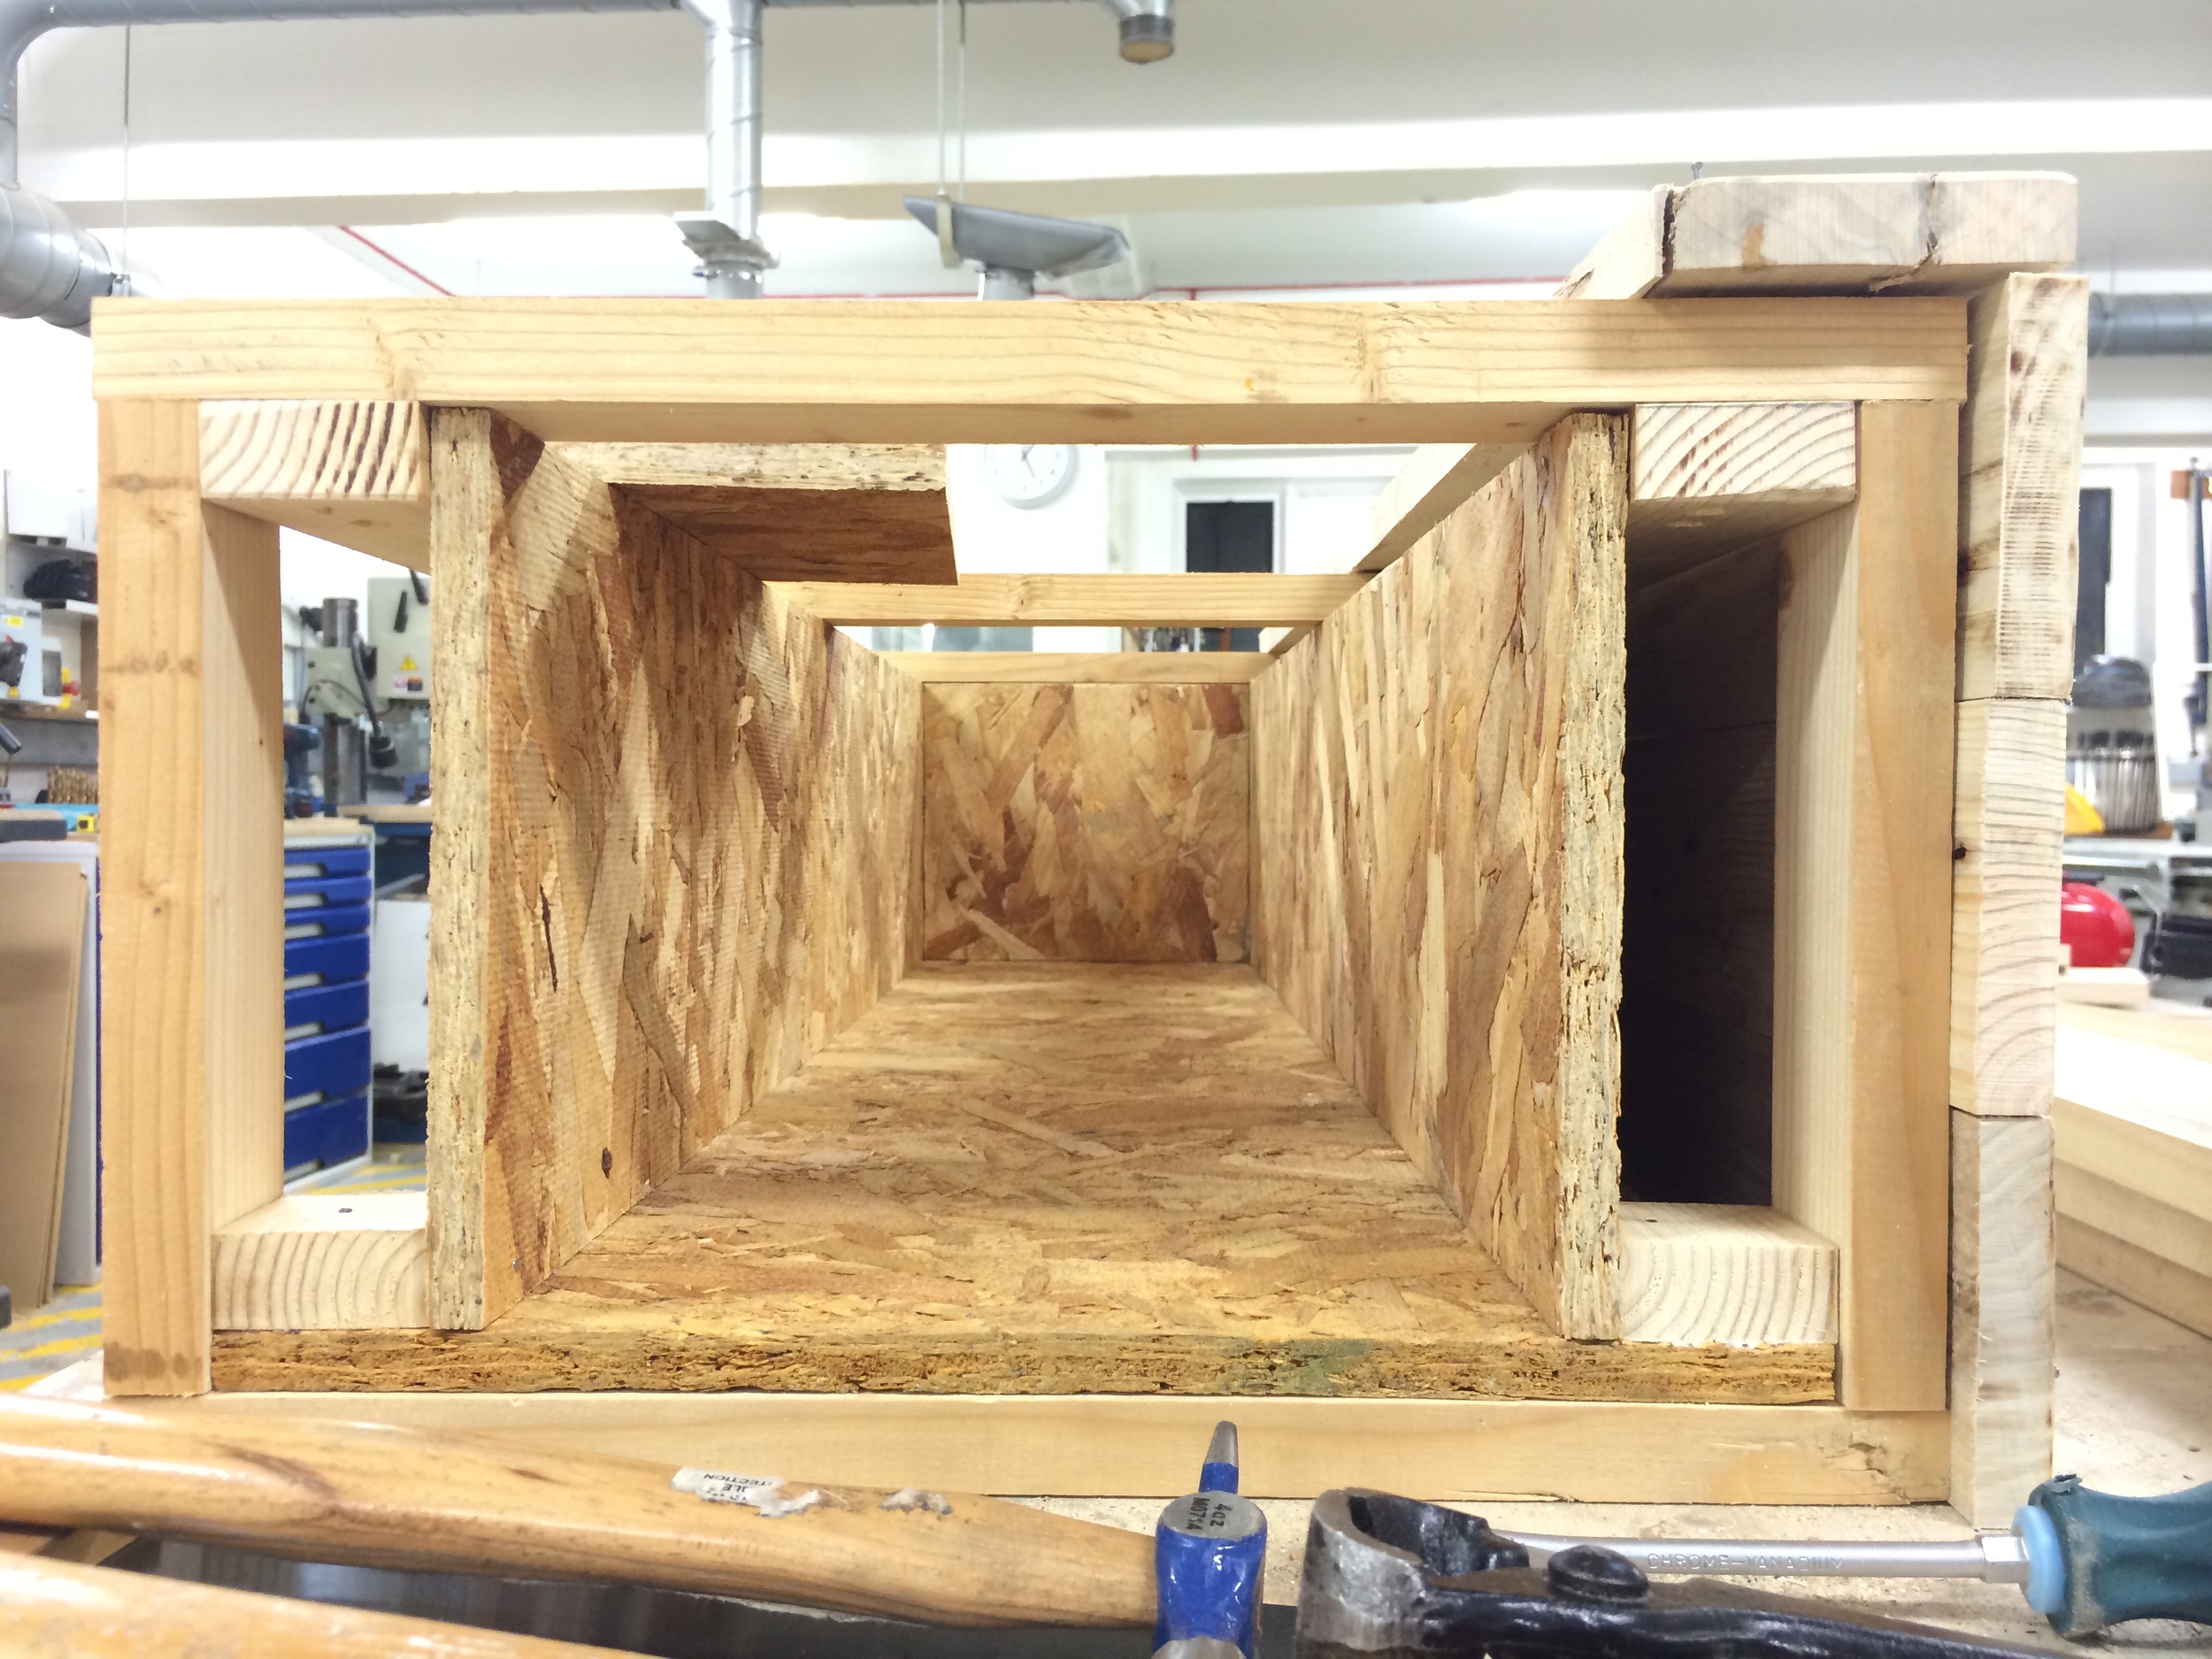
Pre-Fabrication - Central Roof Beam & Column
Learning from the previous Live Build Project, we learnt the value in pre-fabricating elements off-site. This was required for the central beam due to its length and complicated design, as it allowed us to accurately and cleanly construct the beam. The use of a cut lists throughout the project was vital to keep track of the various elements and to reduce wastage.

Pre-Fabrication - Roof Scissor Beam
Due to confusion while on-site and one vital dimension being left off the working drawings for the roof construction, elements of the overhanging roof would require to be pre-fabricated at both the University Workshop and the Kielder Workshop. A scissor joint was required to allow the roof to overhang at the ends of the wildlife hide, while resting on the wall line and being connected with a number of metal plates. It was during this stage we gained the on-site assistance of Nathan Hudson (Newcastle University Workshop Technician), his technical, carpentry and on-site experience was invaluable during the roof erection. It was a joy to finally get him on-site after many hours assisting us behind the scenes.

On-Site Construction
The time spent on site over this year was the most rewarding / stressful / exciting / tiresome experience I’ve undertaken to date. I whole heartedly enjoyed it however, due to having the opportunity to get stuck in with constructing something that was once the subject of a discussion over coffee and resembled little more than a few sketches. During this process I have learnt a lot about how to work on-site, construction techniques, sourcing materials, yet I still have a lot to learn and aim to carry on learning.

The Completed Structure
Me along with the entire Live Build group are ecstatic as to what we were able to produce, we aimed to be more adventurous and bolder with our design ambitions than previous years yet are still amazed that it all came together the way that it did. This project for me has confirmed something I've been thinking about for some time now, that I need to work more with my hands than just in an office.
I enjoy solving problems, especially when the solution is to make something. I've come to enjoy working on smaller projects due to the quicker lead times, I think that's why this project attracted me so. In fact it was something I was introduced to during my opening interview and has been my main point of focus for me entire masters.
Enough talking now please enjoy a collection of the finished photos found below


Project.Three : A.Coffee.Stash.Box
This next project was bar far my most successful up to date, I learnt some vital lessons through partial failures in the previous projects which I've brought into this one. The aim was again to extract timber from a palette, as it's a cheap source of rather high quality materials, if you can be bothered to spend the time extracting it.
laying Out The Length Of The Box And Rib Positions

The Basic Frame Complete With The Cladding Starting To Be Applied
Above are photos of the earliest stages of the project. I had set up the basic dimensions of the box by constructing a base frame which I'd then pin on the cladding. I made sure during the initial laying out/design stage to take into account the thickness of the material I'd be working with and the width of the planks, as I wanted to express the different overlapping planks on the end of the box.
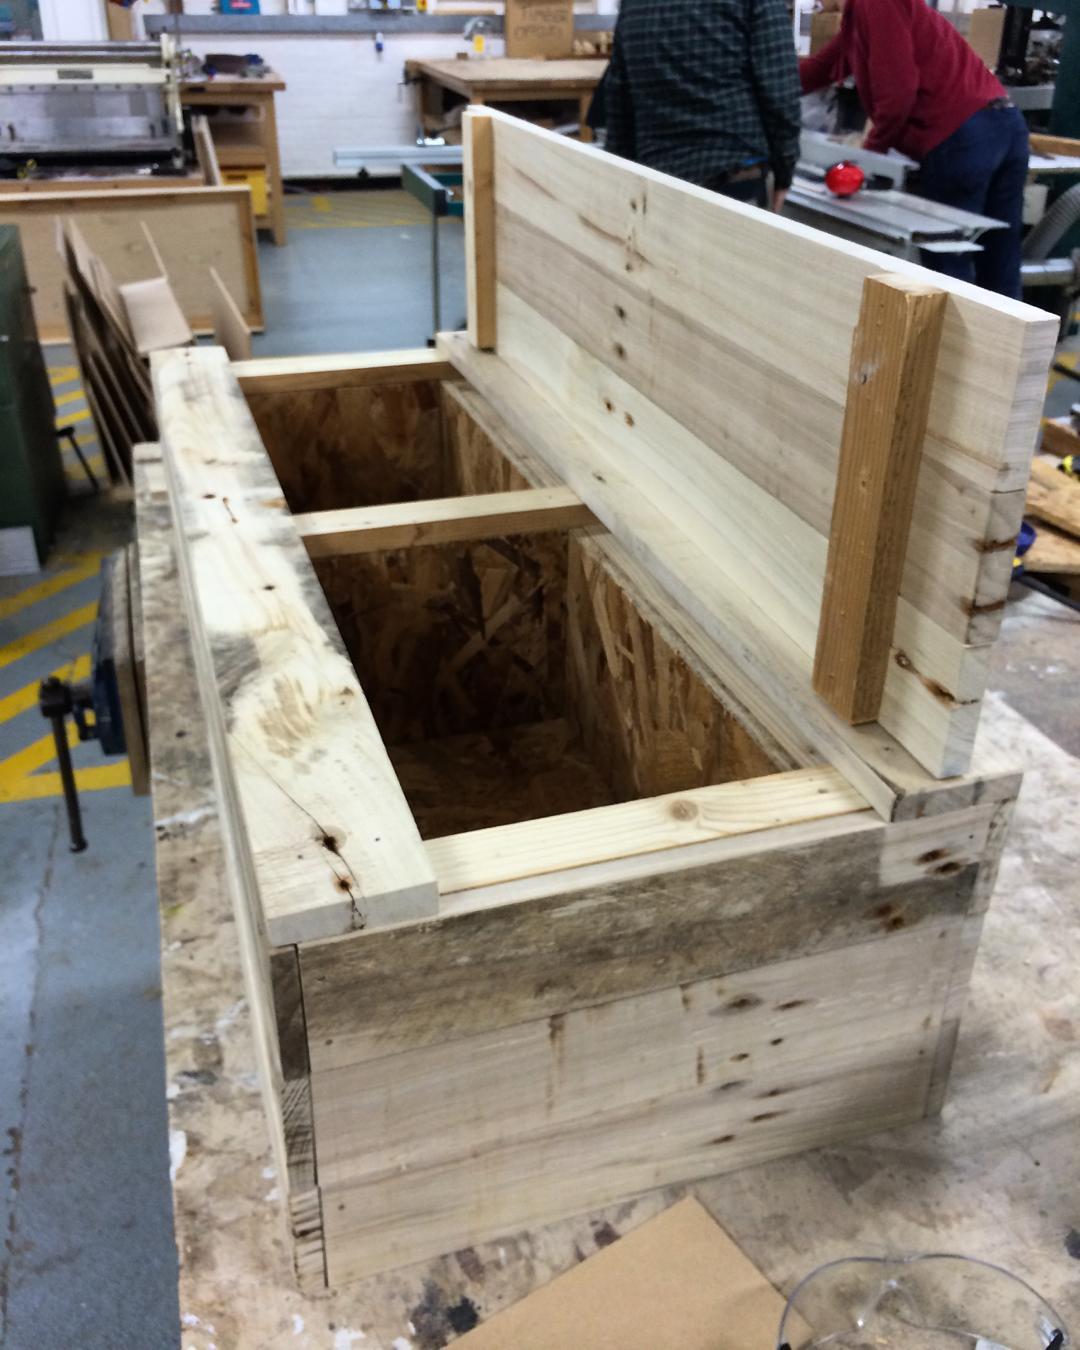
Internal Compartment On The Way
By not totally pinning the cladding down I had the option to add additional design features as I went. One of the most important features of this projects wasn't thought of until I was well under way. By forming a second space inside the box and allowing the middle planks on the top the box to be removed I added a "secret" compartment to the now named "stash" box.
The Box All But Comlpleted
Once all the fixed cladding was pinned into place I was able to start work on the lid to the box. I wanted it to be as subtle as possible, with no real signs that the box in fact opened from the outside. the was simply created by pinning the top three middle planks of the box internally. The cleaver bit was making sure the bracing timber didn't obstruct the positioning of the lid, while also using it to stop the lid sliding around. When closed the box looks seamless, while still being easy to open up and easier to close again. The box was all but complete at this stage, except for the handles which I was still deciding how to achieve and the legs.
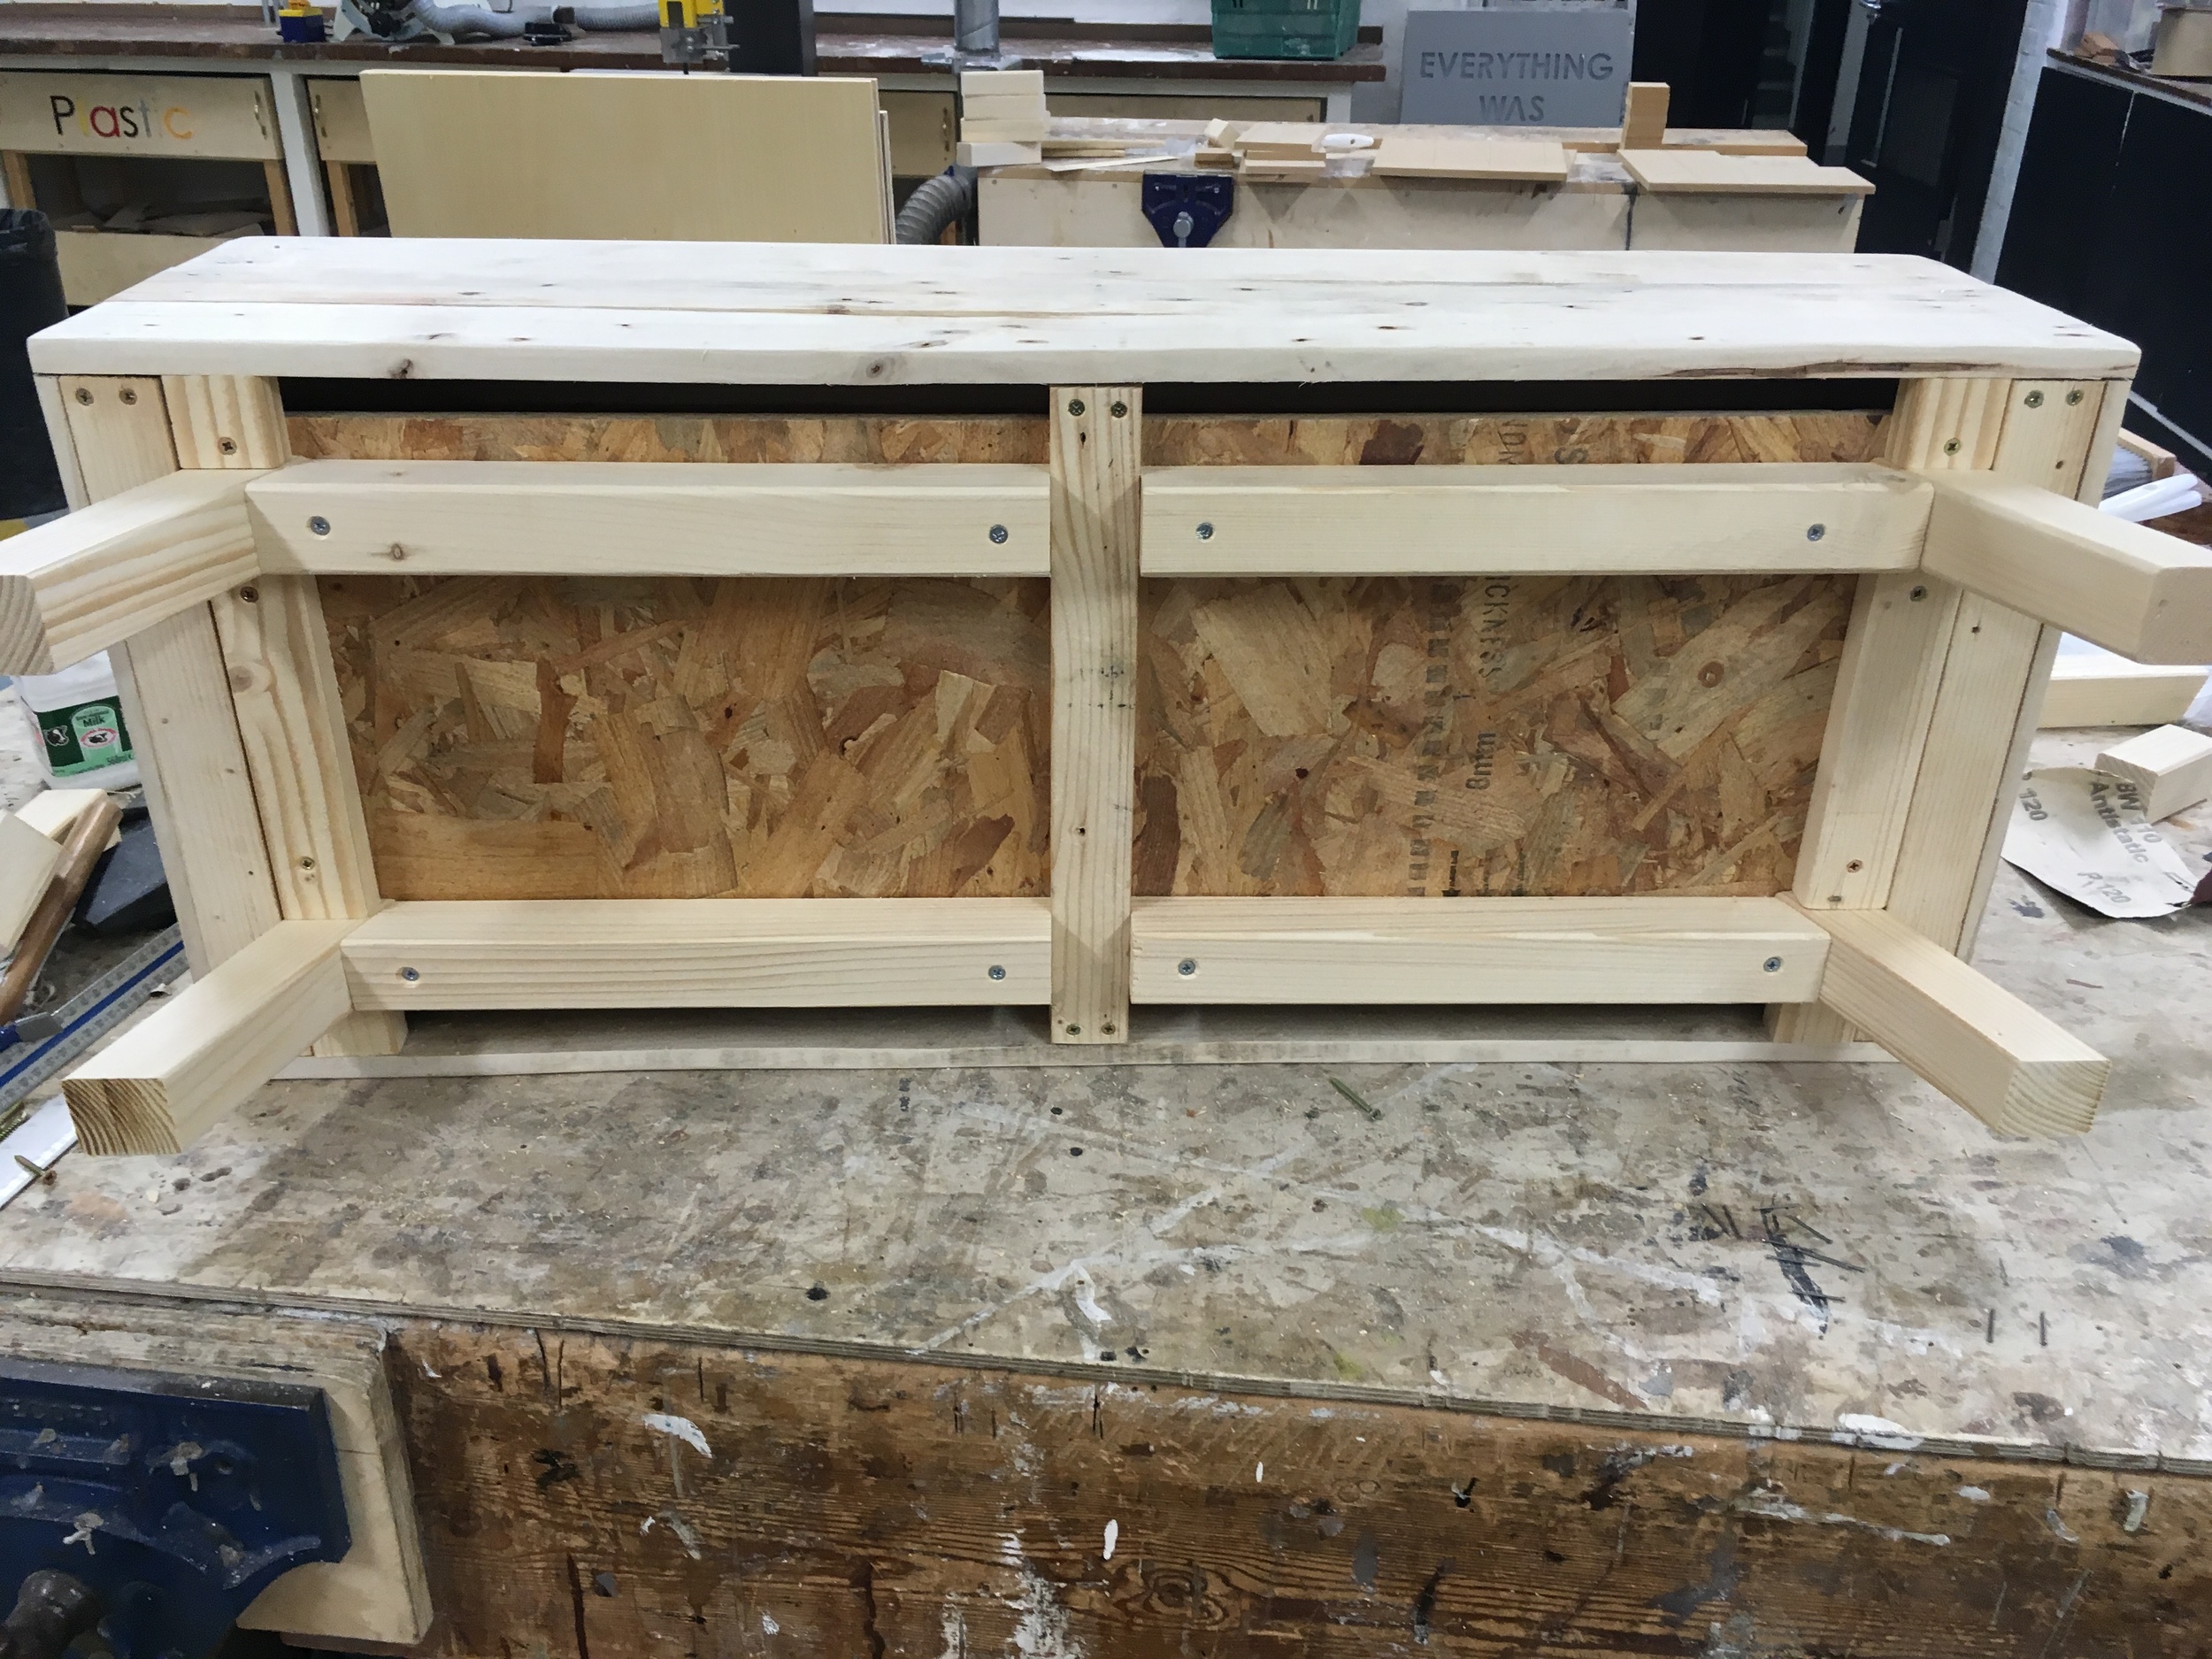
Underside Of The Box Showing The Leg Supports
The leg design came about from me finding a series of pieces of 40 x 40 mm timber which had all been cut at the end to a slight angle. This led me to incorporate a slight camber to the legs, which as you'll see later work well against the horizontal lines of the planks. The legs were cut down to the same angle on either side and then where pinned in place by additional timbers. At this point I learnt another lesson, as despite this system being very strong with screws along. I was later informed had I glued the legs in place first and then screwed them in, they'd have been able to stand the weight of potentially two people standing on the box. There's always next time.

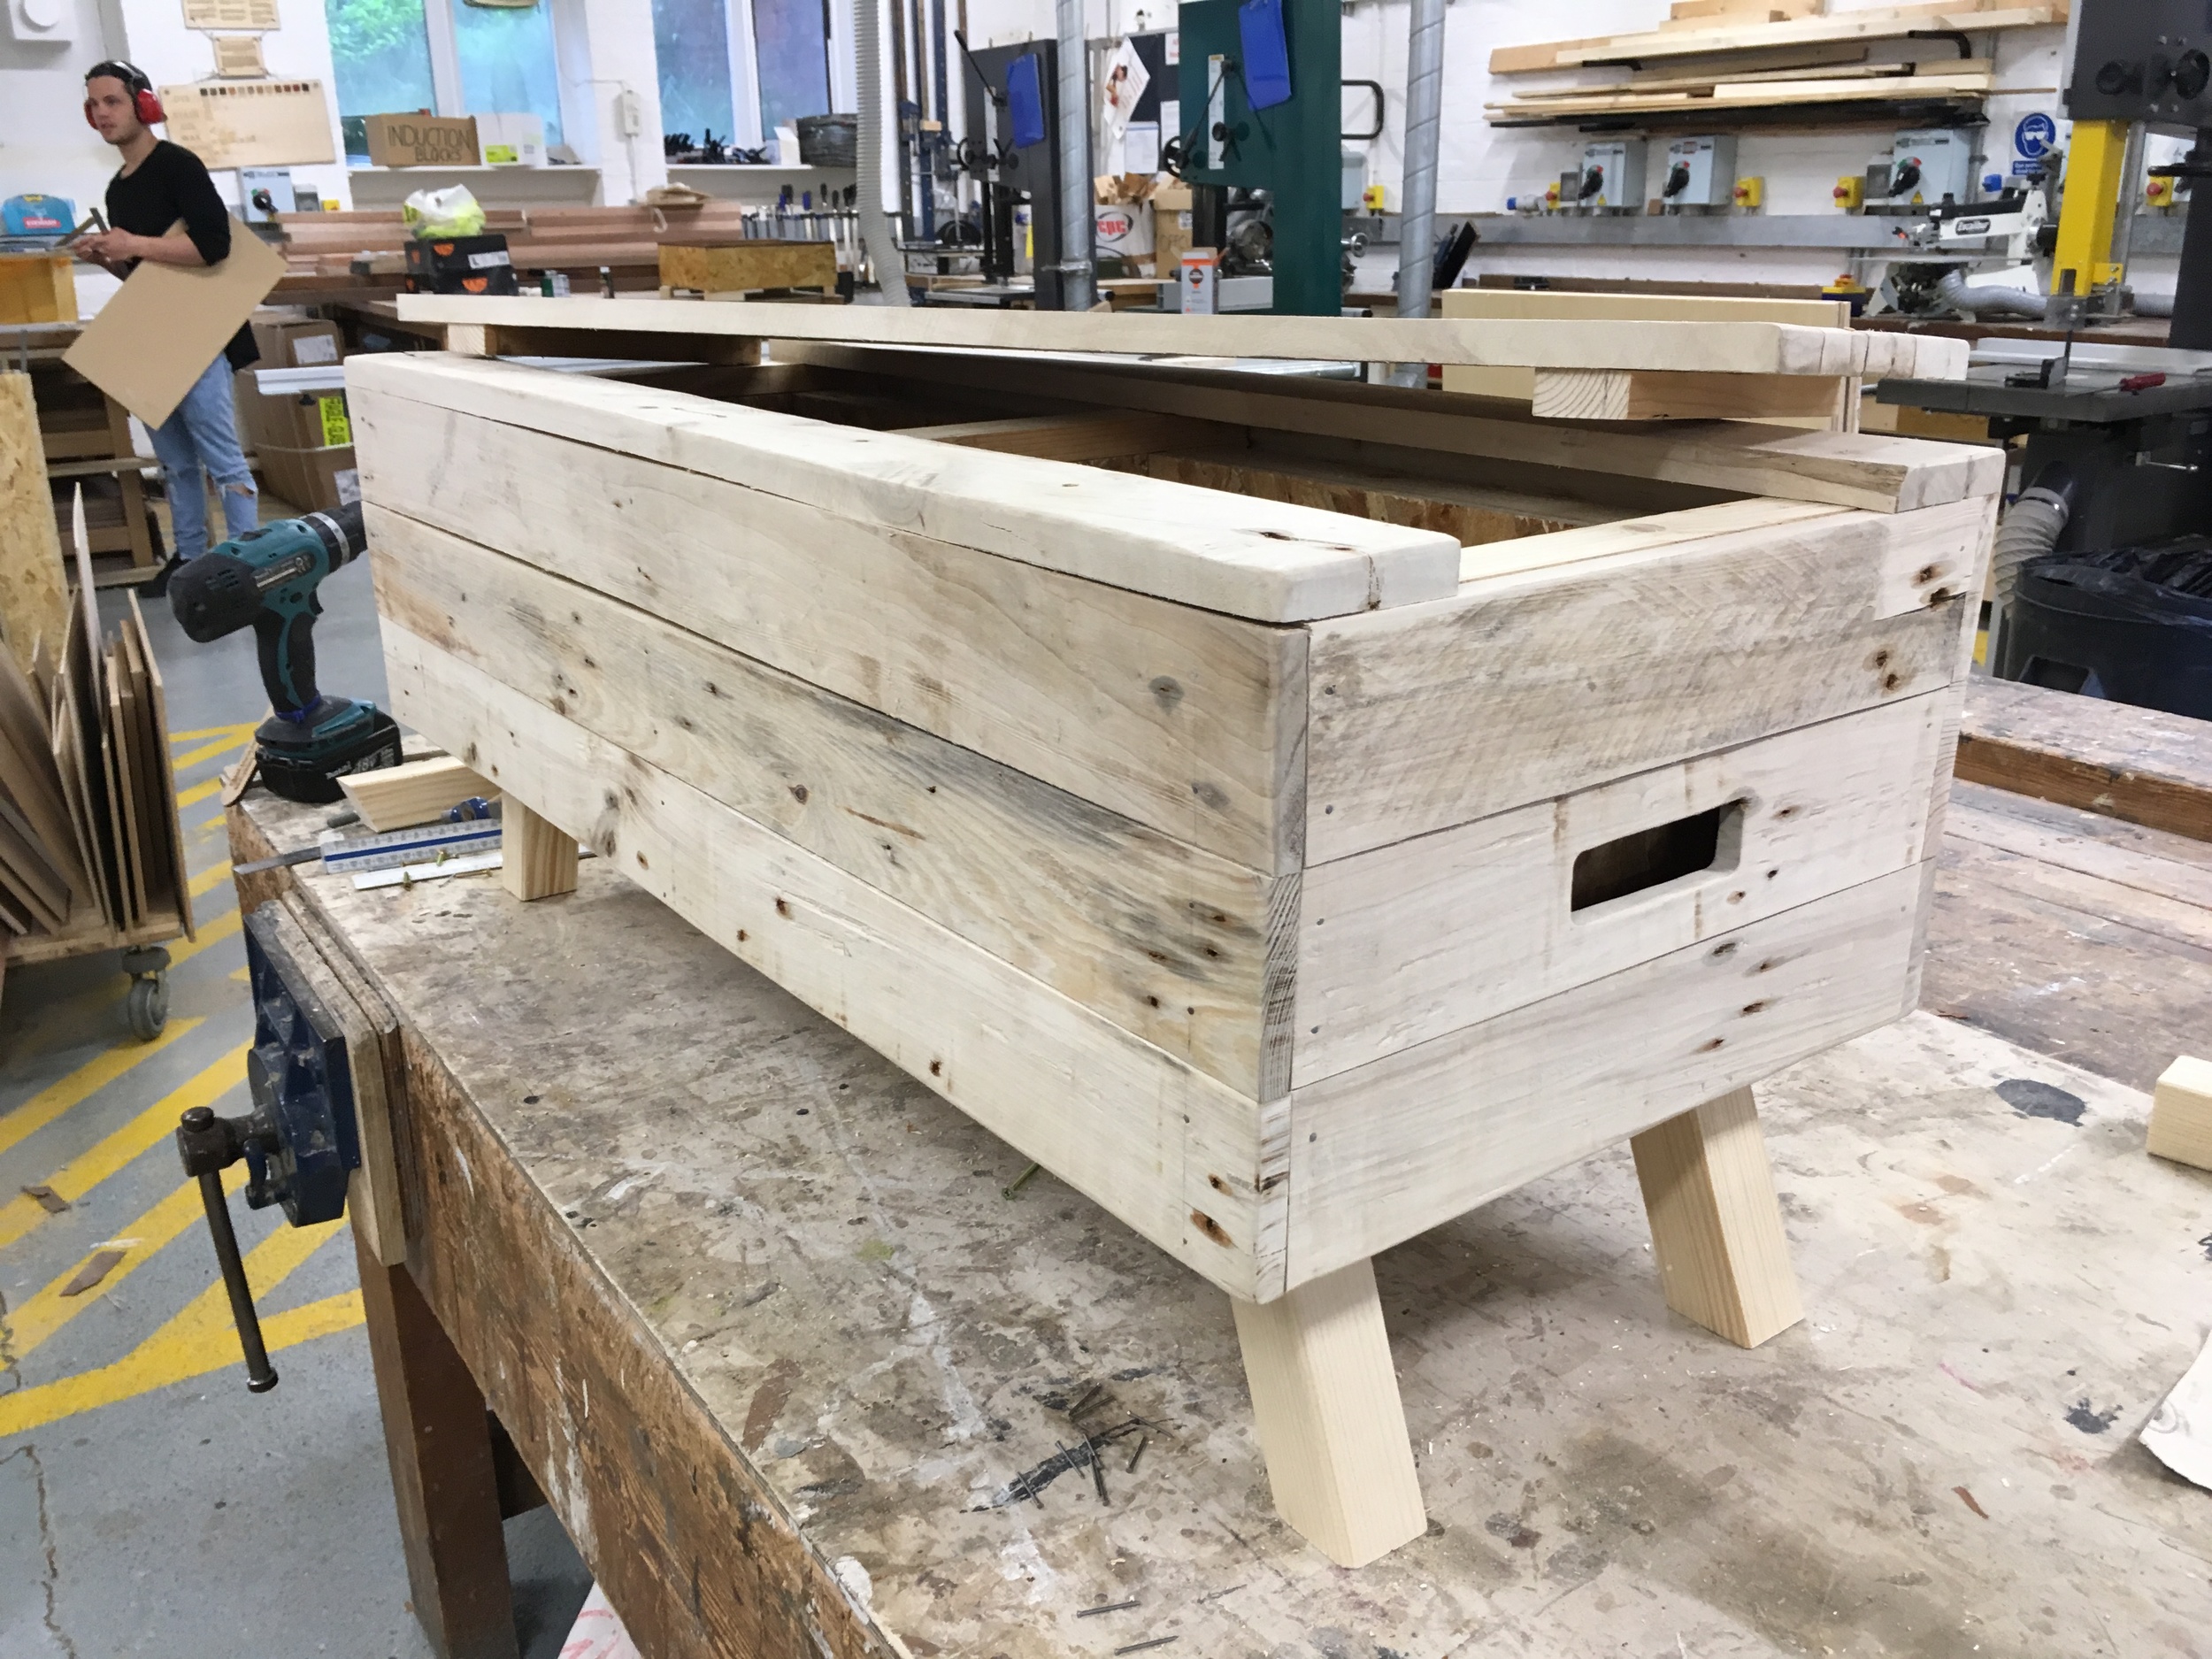
Handle And Legs All Finished Off
Despite considering the idea of creating rope handles, I ended up moving away from that idea as I believed it would make the box feel too nautical. Instead by not pinning the middle planks on until the end, I was able to create very simple hand holes, which then delightfully showed the OSB internal compartment. The contrast between the lightly coloured Ash planks on the end compared to the textured "orange" internal OSB ended up being one of my favourite details of this project.
The Finished Project
There it is, all finished up and sitting surprisingly level. Despite starting this project in early January It took me till early June to get the time to complete it. In total It took me about 4 maybe 5 days to complete, that's including the day of ripping up the palettes. I'm very pleased with the outcome of this one, it's definitely my best yet, for obvious reasons and was a nice way to end the first year of my Masters at Newcastle. I have some other ideas that I'll be working on over the summer, but I won't likely get a chance to undertake them for some time. I'll give you a hint though, the next one will again feature palette wood, shocking I know. This time however I'm going to be trying to express the interesting nature of the wood grain instead of it's cosmetic appearance.
Project.Two : A.Recycled.Picture.Frame
This project was far more personal, than mere exploration with materials however that is the primary over-riding aim of these projects. For last Christmas my parents had the idea of assigning secret Santa's for the family gifts, a nice idea as unlike the previous year when I was working I was completely broke around Christmas time. I was assigned my mother and the letter R, so I decided to make her a picture frame out of Recycled timber from an old palette. Then to keep the R theme going I produced a series of silhouette portraits for our immediate family, even the dog and cat were photographed to much hilarity.
First things to point out, palettes are very strong. it took me and a mate of mine a few hours to pull apart a number of the bloody things, this isn't surprising due to the role. Secondly, if your willing to spend the time coaxing the timber out of them, palettes are a great source of if your lucky free timber. Which as you can see below can often possess amazing colours and stains, adding an element of time to your work.

Just Look At Those Wonderful Colours and Lines
Again with this project I learnt a few lessons about wood working, the most important of which is to let the timber become moisture settled before working it. Upon extracting the planks from the palette I jumped straight into planning it down and working it into the shape. This was a major error as having not completed the frame on the first day I came back to find all the timber had warped over night. So lesson learnt, be patient and let the timber settle before using it.
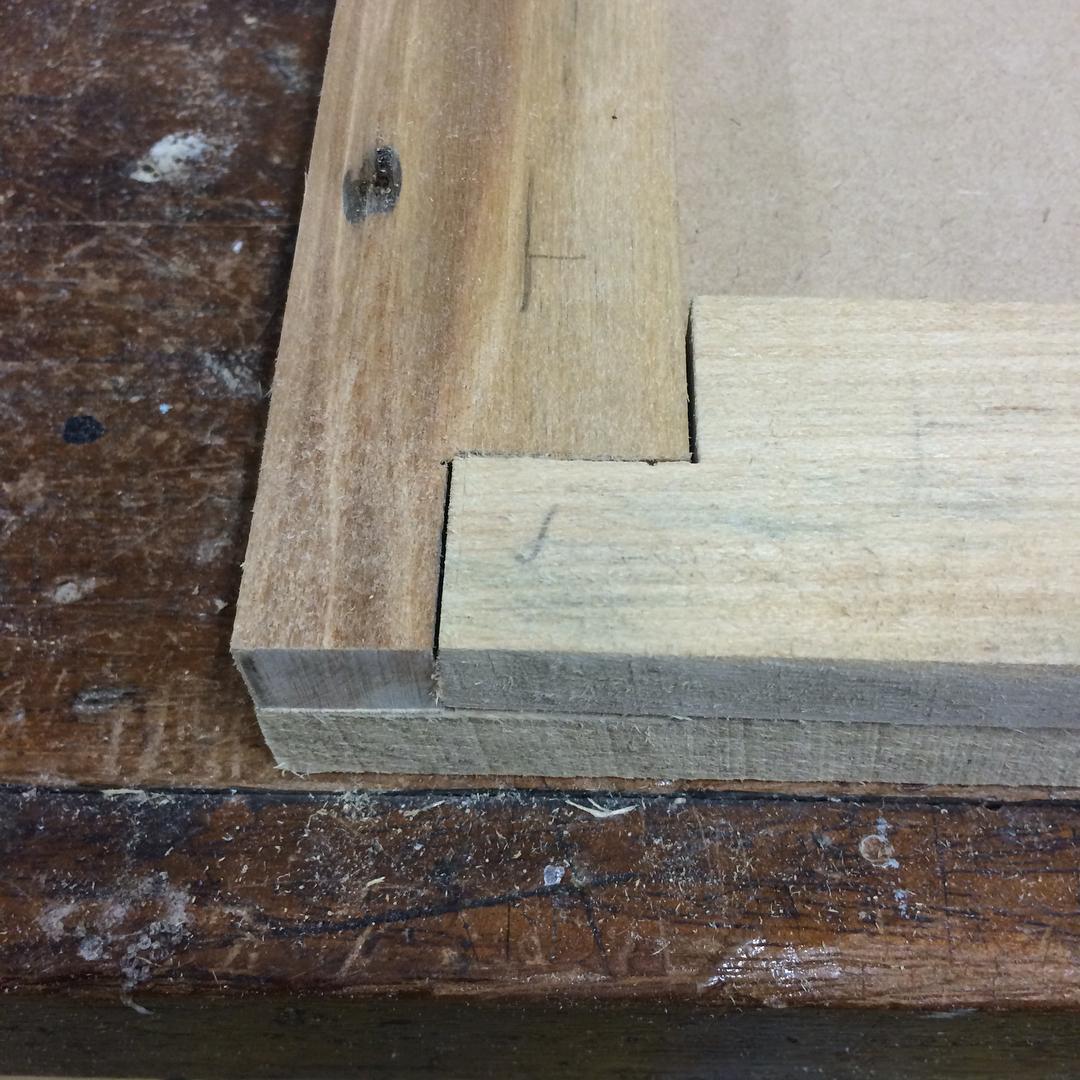
Attempting An Overlapping Joint To Express The Different Pieces Of Wood
Above you can see the joint I used for the corners. The reason behind this was to remove any need for glue in the frame and by instead pining the corners with nuts and bolts add an industrial feel to the recycled timber picture frame. Also by using nuts and bolts the frame could be pulled apart and the content inside could be easily changed, or at least that was the idea, the reality was a tad more fiddly.
More Information and photos on this project to come
Project.One : A.Studio.Storage.Box
The aim of this project was to experiment with working with dove-tail joints for use in a future project. I wanted to create a small wooden storage box for my university studio desk, for no other reason than I wanted to get out of the Studio for half a day and make something.
What I learnt from this project was that the move teeth and groves you try and use for a Dove-Tail joint the harder it is to marry up the faces. Initially I had aimed to create an open top box of 5 sides, after creating 3 of the faces I submitted that firstly using 22mm Ash faced multi ply was a poor decision as it's not very workable and secondly attempting to chisel out the teeth proved lengthy and inaccurate.
It was a good first project and I have used it numerous times since I placed it on my desk part way through first term, so by that definition it was entirely successful.
The Storage Box In It's New Home